Product Information Manager : Work Area
Access
To get access to the Work Area browser click:
- Im-/Export - > Work Area (in the Administration section);
 -
> System -
> Work Area (in the
Files section).
-
> System -
> Work Area (in the
Files section).
Contents
Overview
The Work Area is a personal space allowing users to directly manage (i.e. to store, create, modify & delete) files, folders, images, datasheets or any other files related to a catalog. It ensures the product attributes are accurate and complete by storing and updating information in one central repository.
The browser window displays the name, size, date the file or folder was created/updated and icons/symbols representing various operations that can be performed specifically to the file/folder.
|
A folder is an entity in a file system which contains a group of files and other directories. A typical file system may contain thousands of files, and directories help organizing them by keeping related files together. A directory inside another directory is called a sub-directory. Together, the directories form a hierarchy, or tree structure. |
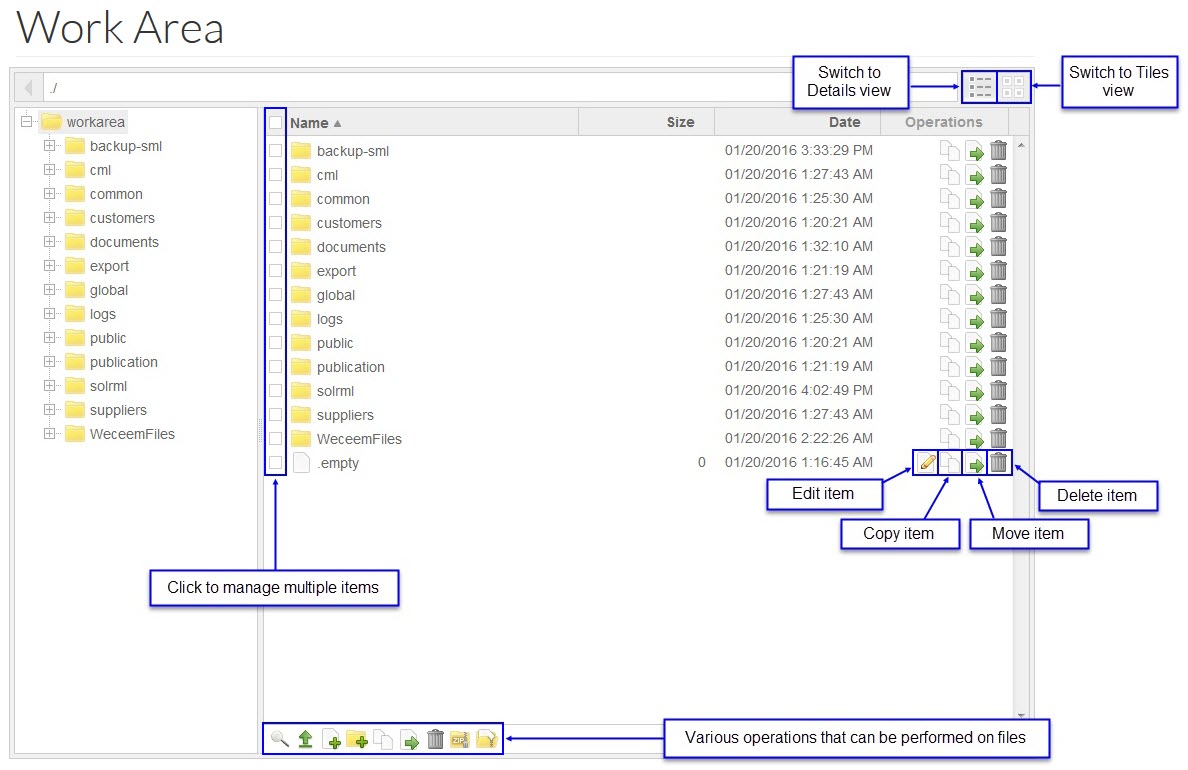
Files/folders can be selected by clicking the appropriate
 check boxes as required to upload, create, copy, move, delete, zip and unzip
files/folders.
check boxes as required to upload, create, copy, move, delete, zip and unzip
files/folders.
Upload File(s)
The process of transferring a file from your file system to your Work Area via the Work Area browser is referred to as Upload. This option allows users to directly add files to the Work Area. While only one file can be uploaded at a time, there is no restriction on the file type.
To upload a file, click the
 icon at the bottom of the browser to open an upload dialog box. Enter a name of the
file to be uploaded or use
icon at the bottom of the browser to open an upload dialog box. Enter a name of the
file to be uploaded or use
 to select it and then enter the file path and click the
 button
to upload.
button
to upload.
|
Create File
The process of creating an empty file is defined as Create File. Any file type, such as text file(.txt), doc file(.doc), excel files(.xls), etc. can be created.
Click the
 icon displayed at the bottom of the browser. A dialog box opens. By default, the
current folder is the location of a new file. Alternatively, enter the location details for the file manually. Enter the file name with the desired extension and then click
icon displayed at the bottom of the browser. A dialog box opens. By default, the
current folder is the location of a new file. Alternatively, enter the location details for the file manually. Enter the file name with the desired extension and then click
 to
create a file.
to
create a file.
Create Folder
Click the
 icon, which opens a dialog box. By default, the path is the current folder in
the Work Area. Alternatively, enter the location details for the folder manually. Enter a folder name and then click
to
create a new folder.
icon, which opens a dialog box. By default, the path is the current folder in
the Work Area. Alternatively, enter the location details for the folder manually. Enter a folder name and then click
to
create a new folder.
Note that the folder's path must refer to a valid path of the folder starting at the root level of a volume or at the level of the database folder.
Copy File(s)
This function adds copies of data or files (text or pictures) to the location specified while leaving the original data or the file unchanged.
Select the file or folder to be copied, click one of the
![]() icons, either in the
Operations column of the browser or the one at the bottom of the browser. Provide the new file/folder name with the path name/location and click
icons, either in the
Operations column of the browser or the one at the bottom of the browser. Provide the new file/folder name with the path name/location and click
 to
initiate copying.
to
initiate copying.
Move File(s)
This function moves files or folders from an existing location to another.
Select the file or folder to be moved, click the
 icon displayed in the
Operations column of the browser or at the bottom of the browser. Specify the new path name/location to which the file/folder is to be moved and click
icon displayed in the
Operations column of the browser or at the bottom of the browser. Specify the new path name/location to which the file/folder is to be moved and click
 .
.
|
While moving the file or folder, if the destination folder is not found, the folder is created. |
Delete File(s)
Delete removes data or files from the existing server list.
Select the file or folder to be moved, click the
 icon in the
Operations column of the table or at the bottom of the browser. A confirmation dialog appears, click
icon in the
Operations column of the table or at the bottom of the browser. A confirmation dialog appears, click
 to confirm
deletion.
to confirm
deletion.
|
Deleted files or folders cannot be retrieved. |
Create Zip Archive
Files/folders can be compressed using ZIP. Select the file/folder to be compressed and click the
 icon. Provide the zip file name and the location where the file/folder should be
saved. Click
icon. Provide the zip file name and the location where the file/folder should be
saved. Click
 to zip.
Unzip Archive
Use the unzip function to decompress zipped files/folders. Select the zipped file/folder to be unzipped, click the
 icon at the bottom of the browser which opens a dialog window. If the file/folder to
be unzipped has not been selected, type the name of the Zip file. Click
icon at the bottom of the browser which opens a dialog window. If the file/folder to
be unzipped has not been selected, type the name of the Zip file. Click
 to
unzip the file/folder.
to
unzip the file/folder.
|
If a file within a zipped file/folder already exists in the destination location or some other selected zip file, either change the destination or remove the existing files manually from the destination or deselect the zip file which contains the duplicate files and try to unzip again. |
Edit Files
Use the
 icon under the
Operations column of the file browser table to edit files. However, please note that the e
ditor does not work properly with binary files like xls, pdf, jpg and etc. Use the appropriate editor to modify such files.
icon under the
Operations column of the file browser table to edit files. However, please note that the e
ditor does not work properly with binary files like xls, pdf, jpg and etc. Use the appropriate editor to modify such files.