Product Information Manager : Relations
Access
To get access to the Relations tab, you can use the following options:
- On the Product Search page:
- Click
 to open the Product Editor on the Master Data tab, then click the
Relations tab.
- Click the
 icon (next to
 ) to open the
Relations tab directly.
- Click
- On the Product Preview page:
- Click the
 icon (next to
 ) and select the
Relations option.
- Click the
Contents
Overview
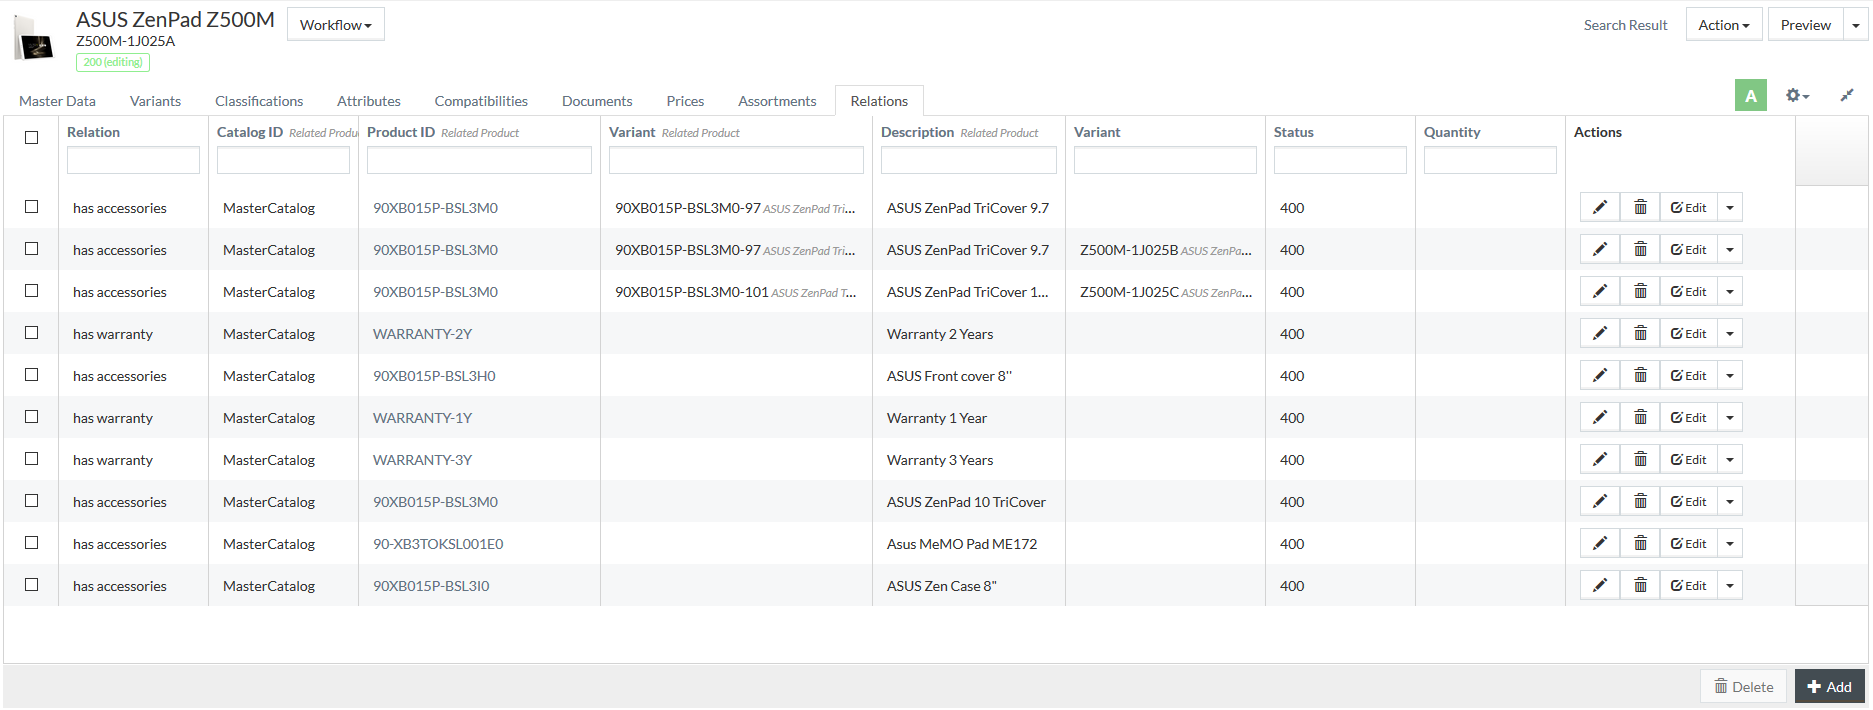
The term Relation refers to the way products (or product variants) are connected with each other. It means the products share a relationship that affects the completeness and usability of the product. The relation can show that the product has accessories, warranties, spare parts, services, etc. connected with it.
Each relation in PIM is bi-directional, which means that when you set a relation from one product to another product, the appropriate relation is automatically added to the related product (with the semantically linked product relation type). The relation types available for selection are defined on the Product Relation Types page.
PIM supports the relations of:
- A master product to a master product.
- A master product to a variant.
- A variant to a variant.
- A variant to a master product.

|
It is not possible to create the following self-relations on the Relations tab:
|
The Product ID of the related product is a link to the Preview page of the related product.
See the Common Toolbar section of the Product Editor page for more info on the generic actions.
Add Product Relation
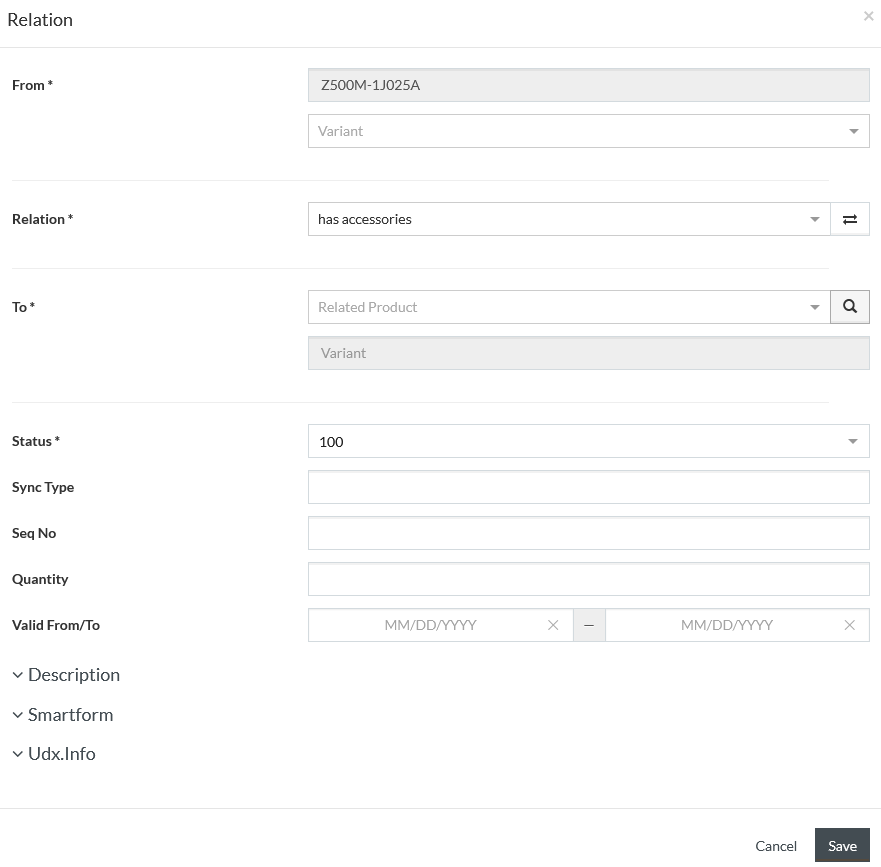
To add and assign a relation to a product/product variant, click
 at the
bottom of the grid.

The following fields are required:
- From: a field pre-filled with the product ID. You can also select its Variant from the drop-down list, if the product has variants and you want to establish the relation for the specific variant.
-
Relation: select a relation type from the drop-down list. The relation types available for selection are defined on the Product Relation Types page.

There are two types of relations directions available in the system:
- From source product to target product: e.g. Asus ZenPad (source product) has accessory (relation type) named Asus Zen Case (target product).
- From target product to source product: e.g. Asus Zen Case (target product) is accessories for (relation type) Asus ZenPad (source product).
-
Click
 to change the relations direction (source-to-target or
target-to-source) and see the list of the available relation types within each relation direction category in the drop-down list.
- To: enter the Related Product
using the
 icon or a drop-down list. You can also select its
Variant from the drop-down list, if the related product has variants and you want to establish the relation with a specific variant.
- Status: select a status for the relation from the drop-down list.
Here, you can also enter the following information for the relation:
- Seq No: define the number for easy sorting of entries in the Relations grid.
|
Seq No value is alphanumeric. |
- Quantity: enter the required quantity of related products/variants, if any. For example, the product may require a certain number of specific accessories.
- Valid From/To: select the time period, for which the relation is applicable.
|
Sync Type is currently not applicable. |
Click the
Description section's header or the
 icon
to unfold the section.

Enter the description for the relation in the Content Language (default) or any other language from the list of languages:
- Click
 to
open the list of available languages and select.
- Enter the description in the appeared text area field.
Click the Cross icon with the Language ID to delete the description in the relevant language, when needed.
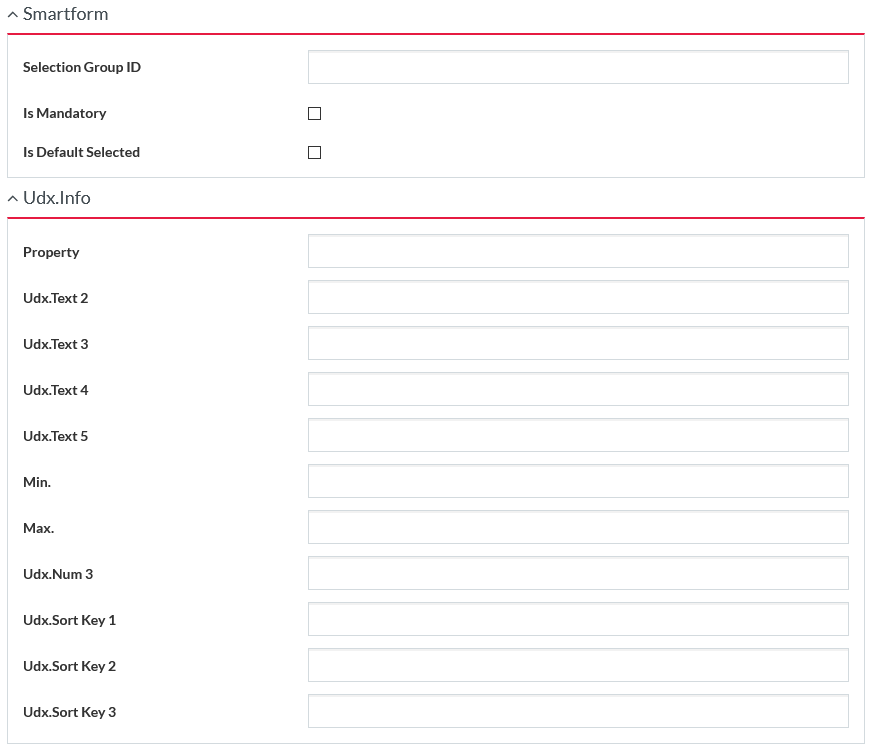
Click the
Smartform and
Udx.Info sections headers or the
 icons to unfold the appropriate sections.

There is an ability to use Terms in the Udx.Info section (for the first 5 fields). See the Terms page for more information.
Fill in all the necessary data and click
 to save
the relation.
Edit / Delete Product Relation
Select the relation from the grid and click the corresponding
 icon under
the
Actions column to edit the entry.
The following fields are not available for editing: From, To and Relation.
When opening the entry for editing, the Audit Info section appears. Expand this section to track who and when made the last changes to the entry.
Click the
 icon
under the
Actions column of the grid to delete a product relation entry from the list.
|
In case a product relation is deleted, the reverse relation is also automatically removed from the related product. If one of the related products is deleted, the relation is also removed. |
Select the appropriate check boxes and click
 to delete
chosen entries.
Navigation to Related Product
Click
 in the
Actions column to open the Master Data tab of the related product. Click
 to select
a Product Editor's tab of the related product from the drop-down list and to navigate to the relevant tab directly.
In case of a relation to a specific product variant, the selection of a tab option under
 opens the relevant Product Editor's tab with the prefilled
Variant ID as a filtering criterion (except for the Variants tab, where no filtering is applied). opens the relevant Product Editor's tab with the prefilled
Variant ID as a filtering criterion (except for the Variants tab, where no filtering is applied).
|