Product Information Manager : Terms
Access
To get access to the Terms functionality, you can:
- Click Texts - > Terms on the main menu
- Select
Show Terms option:
- From the Show drop-down menu on Search Product page (you can select relevant products or show terms for all products in the search result list).
- From
 drop-down menu by the relevant product on
Search Product page.
drop-down menu by the relevant product on
Search Product page.
- From the Action drop-down menu in Product Editor.
Contents
Overview
Term is a short (usually one word, but in general max one sentence) text, the value and translations for which are stored and referenced to. Using terms, you will need to translate the same text (term) only once regardless of where the value is used/referenced (e.g. Product Attribute Value, Attribute Description, Classification Group Description etc.). Terms have additional characteristics such as grammatical number (singular/plural), part of speech (noun, verb, etc.).
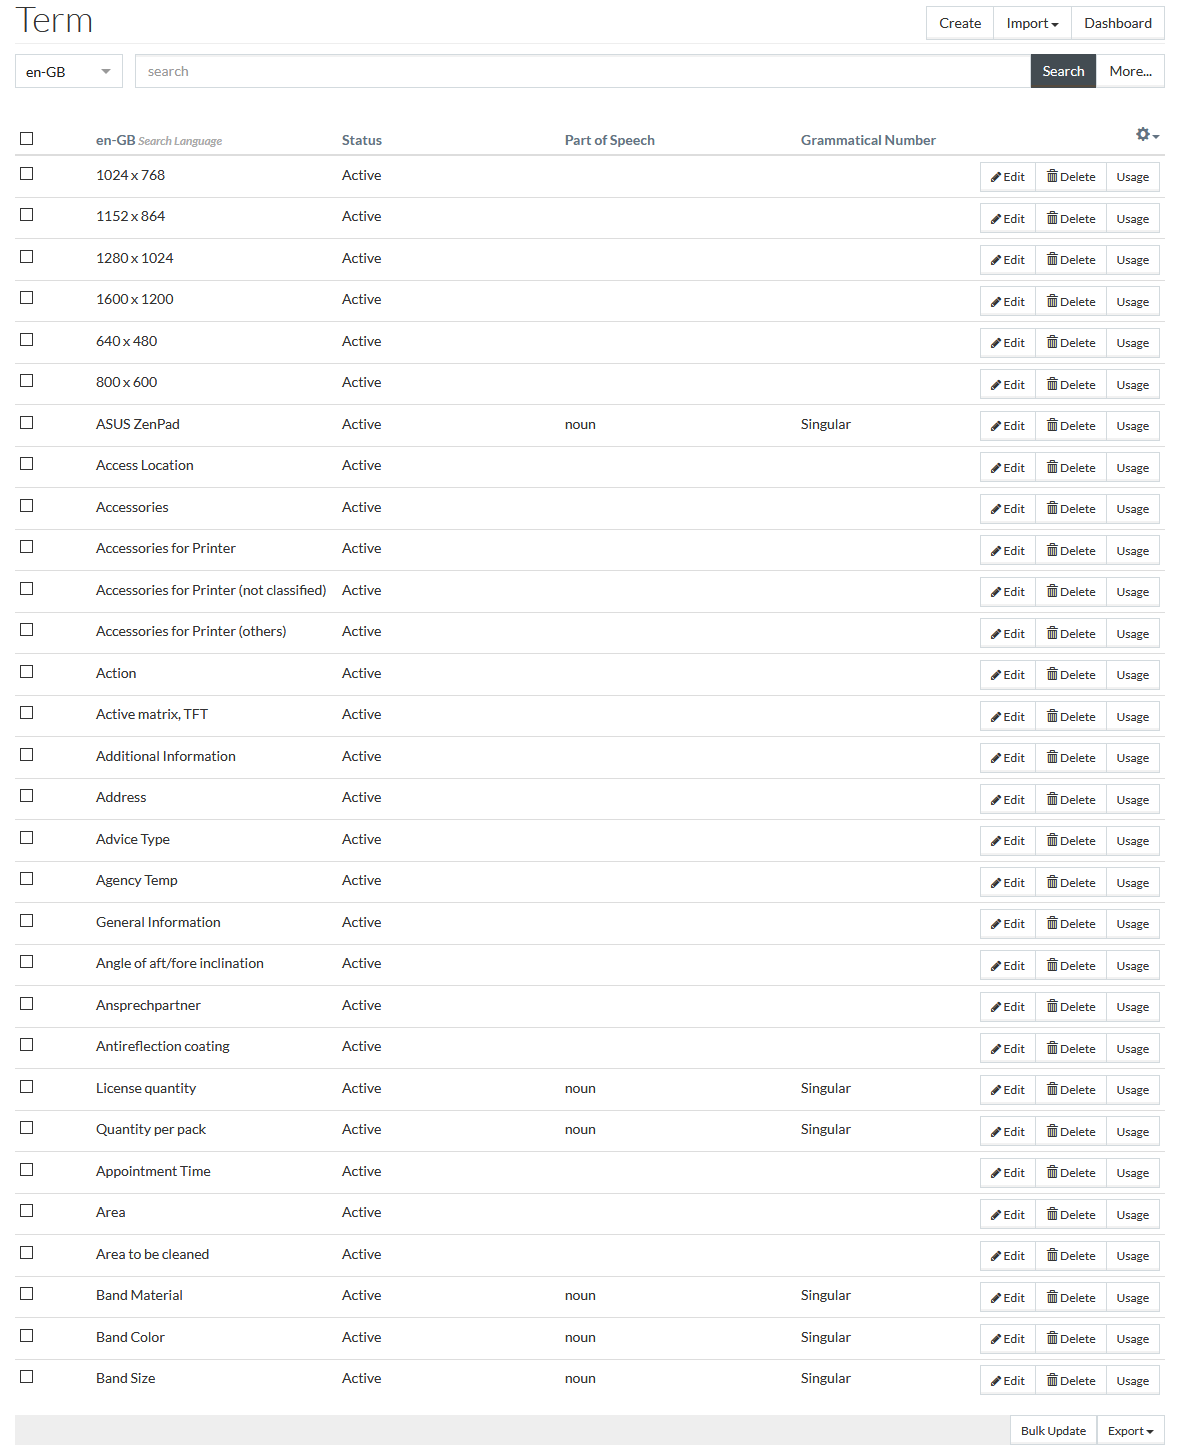
Search for Terms
You can use either Simple or Advanced search to find particular terms or use Show Terms functionality to find terms used for a particular product or products.
Simple Search
Select the desired locale -
language-country combination (e.g.
de-DE) from the drop-down on the left, enter the search query into the search field and click
 to
initiate searching for terms.
to
initiate searching for terms.
|
The list of available languages for the terms is defined in settings.groovy file in the Customization Area. In the language selection drop-down list, they appear in the the same order they are specified in the settings file. |
By default the Search Language is the current Content Language.
When the Search Language is differnt from the current Content Language, the relevant columns will appear (by default) in search results with Search Language and Content Language labels respectively.
Advanced Search
Click the
 button
on the right from the search panel to unfold the
Advanced search section.
button
on the right from the search panel to unfold the
Advanced search section.
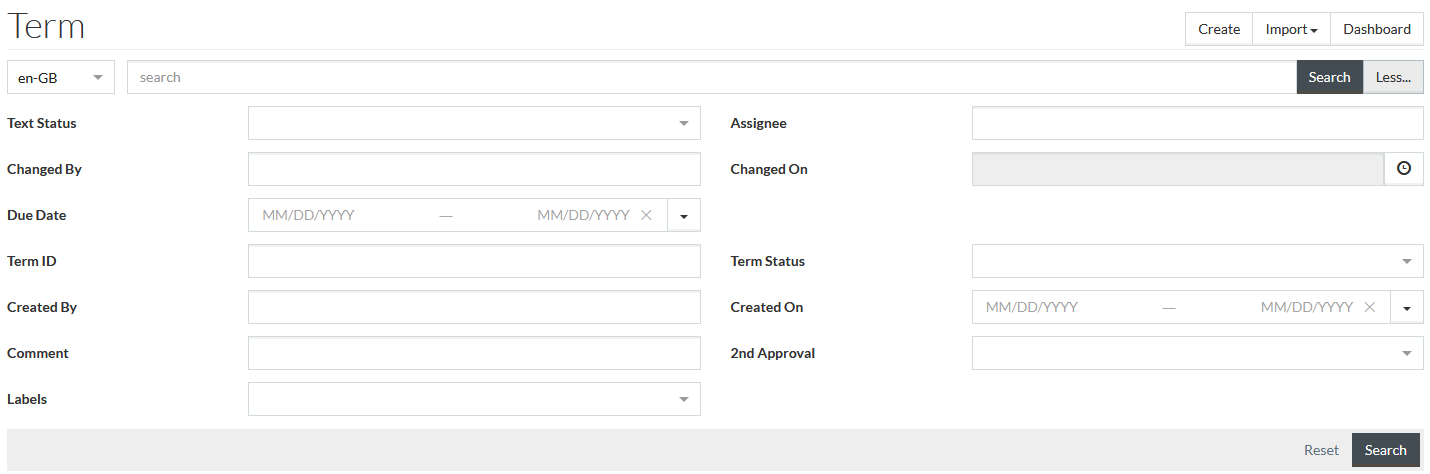
Here, you can select additional search parameters:
- Text Status: status on the translated text, available options:
- New: for the newly created terms/translations that have not been assigned to translators yet or the translation have been rejected.
- Translation in Progress: for the translations in progress. The status is set for internal translations when the
 button is clicked, for external - when the Export
(Excel/JSON) has been executed.
button is clicked, for external - when the Export
(Excel/JSON) has been executed.
- Approval required: for the translations pending approval. The status is set for the internal translations when the
 button is clicked, for external - when the Import
(Excel/JSON) has been executed.
button is clicked, for external - when the Import
(Excel/JSON) has been executed.
- Second Approval required: for the translations pending the second approval. The status is set when the Approve option is clicked in case the term is marked with the ' 2nd Approval' flag.
- Ok: translation is finished and approved.
- New: for the newly created terms/translations that have not been assigned to translators yet or the translation have been rejected.
- Assignee: a user responsible for the term
- Changed By: a user who made the last changes for the term
- Changed On: here you can set various interval conditions using a pop-up window opened upon clicking the
 icon. The parameter is used to find terms, the translations of
which (depending on the search language) experienced changes during the specified time period.
icon. The parameter is used to find terms, the translations of
which (depending on the search language) experienced changes during the specified time period.
- Due Date: set the time interval the term translation is due using a calendar or select a time period from the drop-down list
 .
.
- Term ID
|
Term ID cannot contain any special language-specific characters (for example: ä, ö, ß, etc.). They will be automatically replaced by their generally accepted replacements (ae, oe, ss, etc.). If there is no replacement character available, the character will be replaced with underscore ( _ ). |
- Term Status: status of the term, available options:
- Active: means that term can be used.
- Archived: means that term is obsolete.
|
Archived terms are still available for the usage, they will be highlighted gray within the terms autocomplete dialogs. |
- Created By: a user who created the term.
- Created On: set the time interval the term translation was created using a calendar or select a time period from the drop-down list
.
- Comment
- 2nd Approval: means that more than one approval (translator) is needed for this term. There are some regulations on "dangerous goods" which means that corresponding textual information that
described such a product needs to be written in appropriate way. Available options:
- Required
- Not required
- Labels: labels of the text that can be used for better understanding of the term. Multiple choice is available. When searching by several labels, the terms with at least one of them will be found.
|
In case you are searching by Text Status, Assignee or Due Date fields you should also select the search language (e.g. de-DE), as searching by these parameters is performed for the selected search language only. |
Fill in all the necessary data and click
to
initiate searching for terms under given constraints.
Show Terms
When accessing the Terms page using Show Terms functionality from Search Product page or Product Editor, the term search results show the terms used in product details of a selected product or products.
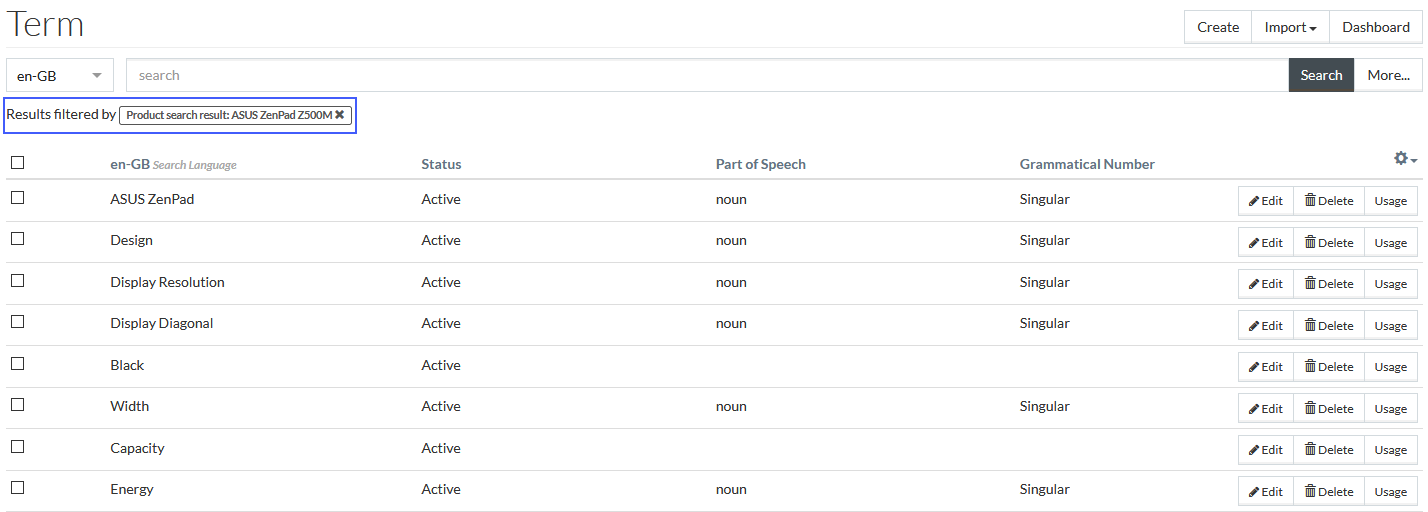
The default Show Terms functionality can show all terms used in:
- Product (product attribute values, document captions and relations Udx Text fields from the Product Editor)
- Documents (document titles and document captions from DAM)
- Value list items (value list items descriptions)
- Classifications (classification short descriptions)
- Classification groups (classification group descriptions)
- Classification group attribute values (it includes value list items descriptions if values lists are used as classification group attribute values)
- Attributes (descriptions)
- Attribute sections (names)
| The places, where the terms are searched, can be configured in jcatalog.product.showTerms.lookup.list configuration attribute. |
| In addition to the above, if any terms are listed in jcatalog.product.showTerms.static.list configuration attribute, they are also included into the terms result list for any product. |
|
Currently, Show Terms functionality does not include terms used in Compatibilities (compatible classification group attribute values/model properties and compatibility constraints). |
Configuration of Search Results
The terms search result table can be configured to the user's personal needs. For this, use the
 in the table header.
Select the languages and other columns to be displayed in the search results and sort them by using drag-and-drop function in any order you like.
|
The list of languages available for the selection is defined by the languages listed in /integration/term/settings.groovy in Customization Area. Their default order also repeats the order they are listed in the customization file. |
Click
 to save
the settings.
to save
the settings.
Click
 to restore the default settings.
Click
 to cancel any changes and close the settings drop-down menu.
The saved settings are user-specific. Every user can save their own settings to display the term search results.
In the search result table, it is possible to sort the results in ascending or descending order by clicking the relevant column header. All columns are sortable, except for Labels.
Create Term
Click
 to
initiate the creation of a new term.
to
initiate the creation of a new term.
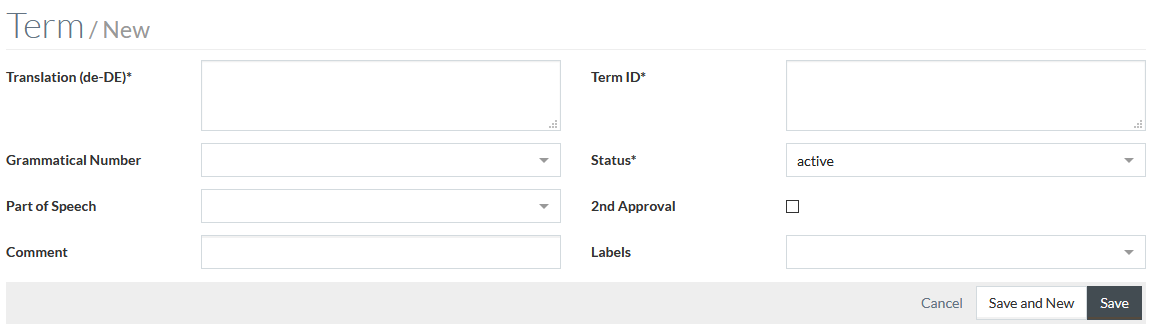
Enter the following parameters to create a term:
- Translation - the Term's translation in the master language;
|
Master language can be configured using the
settings.groovy file in the
Customization Area (
|
 -
>
System -
>
Customization Area -
>
./integration/term).
-
>
System -
>
Customization Area -
>
./integration/term).
-
Grammatical number - grammatical category of nouns, pronouns, and adjective and verb agreement that expresses count distinctions (such as "one", "two", or "three or more"). Available options:
-
dual
- mass
- singular
- plural
-
- Part of Speech - available options:
- adjective
- adverb
- noun
- pronoun
- verb
- Comment
- Term ID - automatically generated as a concatenation by the following pattern: < Term>_< GrammaticalNumber>_< PartOfSpeech>, but can be adjusted/changed manually.
|
The maximum length for the Term ID and term translation is 250 symbols. The terms with the maximum length can be used in all places where the terms are possible, except for Udx fields for Relations in the Product Editor, which are limited to 100 characters. |
- Status -
status on the term, available options:
- Active - term can be used.
- Archived - term is obsolete.
- 2nd Approval - select this checkbox in case special approval process is required (you need two different people for approval).
- Labels - add labels for better understanding of the term for the translator, e.g. "Headline", "Bulletpoint", "lowercase", "uppercase".
|
The list of the available labels can be configured via the config.groovy script located in the Customization Area under the path /integration/termUi/. |
|
Labels may contain alphanumeric symbols, "-" and "_" only. |
Fill in all the necessary parameters and click
 . Click
 to save
the current and create a new term.
to save
the current and create a new term.
The additional section with translations to other languages as well as
 and
and
 buttons will become available.
Term Translation
There are two ways to add the necessary translations for the Term:
- Internally, using Term Editor - in this case all the manipulations with Terms/translations are performed internally in Term Editor, all the people involved in translation process should have access to the Term Editor.
- Externally, using Import and Export - in this case the Terms/Translations will be exported (in Excel or JSON formats), sent to the translation agency and then imported back into the Term Editor and approved.
Internal Translation
Execute search for the desired term and open the Term Editor for it by clicking
 by the
relevant term.
by the
relevant term.
|
The order of the languages in which the text is shown is defined based on the content language settings and can be configured on the User Menu ( Content Language section) or in the jcatalog.dataContentLanguages.order configuration attribute. |
|
The translation (text) for each language should be managed one-by-one, as after each workflow transition ( Start Translation/ Finish Translation/ Approve/ Reject) translations for the other languages (except the one you transitioned) are reset to the state they have on the server side, so changes you made to them will be lost. |
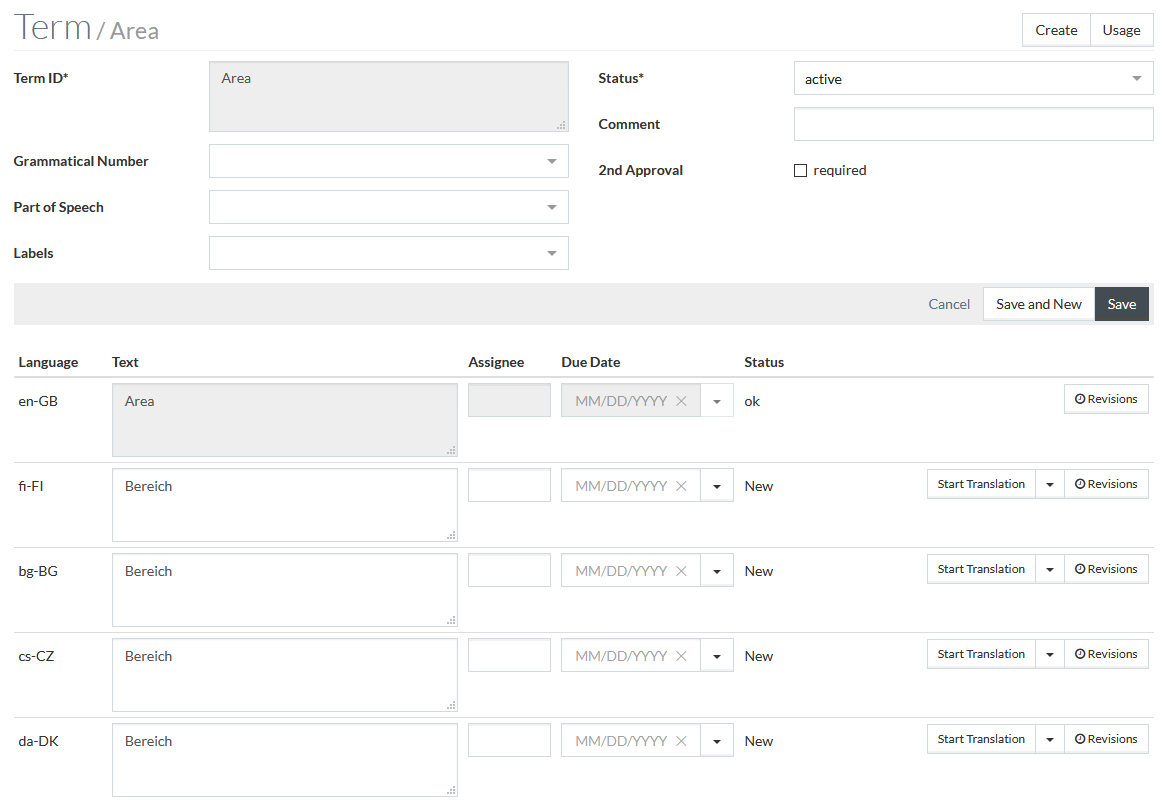
Now the Translated Text for the term in master language should be verified, also you can set the Assignee and the Due Date for translation.
Click
- status of the current translation will be changed to "
Translation in Progress".

Make the necessary changes for master language and then click
.
The lines with translations for the additional languages will be added below after the translation is Approved (see the Translated text approval section for details).
Click Term link in the header to return to the search results.
External Translation (Excel)
The process of the external Terms translation (e.g. by the translation agency) consists of the following steps:
- Export Terms translations to Excel;
- Fill in the translations Excel file;
- Import the resulting file to the system.
Export
Perform a search for the terms needed or choose the appropriate Terms for export using the check boxes
 and select
Excel/Translation option from the
and select
Excel/Translation option from the
 drop-down, the
Export translations to Excel page will open.
drop-down, the
Export translations to Excel page will open.
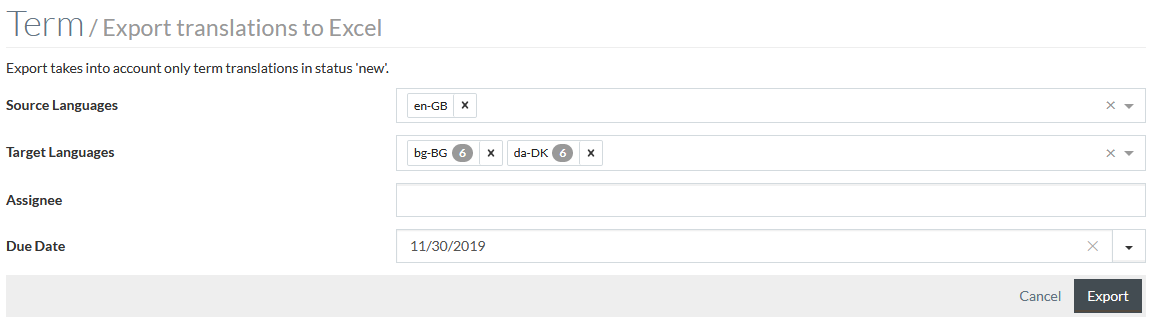
Enter the Source/Target Languages, select the Assignee and Due Date for the translation.
Target Languages field will show the number of terms for translation that will be exported when the relevant language is selected.
Click
 to start
translations export. In the opened window click
Download export result link to download the file.
to start
translations export. In the opened window click
Download export result link to download the file.
|
Exported translations should be in ' New' status, exported translations get ' Translation in progress' status. |
Import
After the translations are added to the file the Translations import should be executed to make them available in the system.
In the upper-right corner of the Term Search page select the
Excel/Translation option from the
 drop-down.

There are two options of the file upload - via drag and drop or by selecting the file from your PC using standard file browser.
Import completed message with the number of successfully downloaded entries or the number of error entries, if any, will be displayed upon the successful file upload. In case of errors, the link to the file containing error messages will appear.
| Imported translations get the ' Approval Required' status. |
Translated Text Approval
After the Term Text has been translated it has to be approved. Click
 to open
the Term Editor for the appropriate Term.
to open
the Term Editor for the appropriate Term.

First you need to approve the Translated Text for the master language.
Select the
Approve option from the
 drop-down to approve the selected translation.
Click
 to
reject the selected translation. The translation will get '
New' status and will have to be translated once more.
to
reject the selected translation. The translation will get '
New' status and will have to be translated once more.
The lines with translations for the additional languages will be added below after the translation for master (by default de-DE) language is approved. After the translations for en-GB locale will be added and approved, the remaining translations locales lines will be added. The set of the added languages is predefined in the State Workflow.

In case the 2nd Approval check box was selected upon the term creation the second approval should be performed, similarly to the first one.
|
If you have selected the 2nd Approval check box for a Term, having approved translations already (Status = ' Ok') then all the translations will get ' Second Approval required' status. |
After the translation is fully approved, it gets ' Ok' status meaning the translation is final and cannot be edited.
It is possible to approve or reject translations of multiple terms at once. Select the terms by ticking the relevant check boxes in the terms list and click
 . See more information in the
Bulk Update section below. . See more information in the
Bulk Update section below.
|
Term Usage
To find the correct translation of a term it can be important to check its context, where and how the selected term is used. For this the Terms Usage page is used. On this page all term usages are listed.
Also this page can be used to check what needs to be cleansed in case you are going to delete a term.
Click
in the
top right corner of the Term Editor or use the button corresponding to the appropriate term on the Search Term page. Terms Usage page will open.
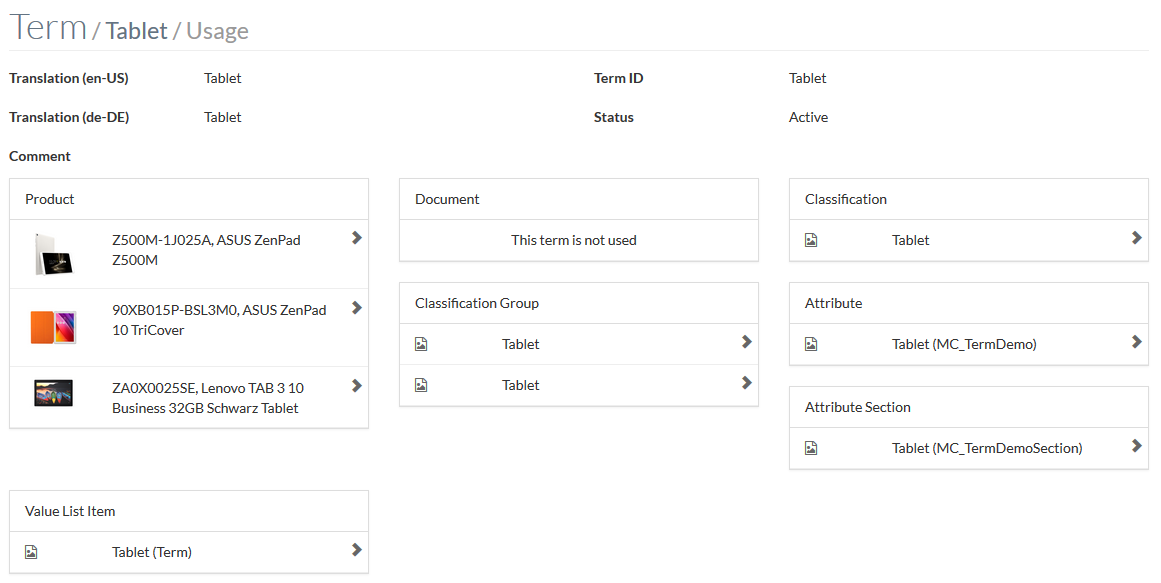
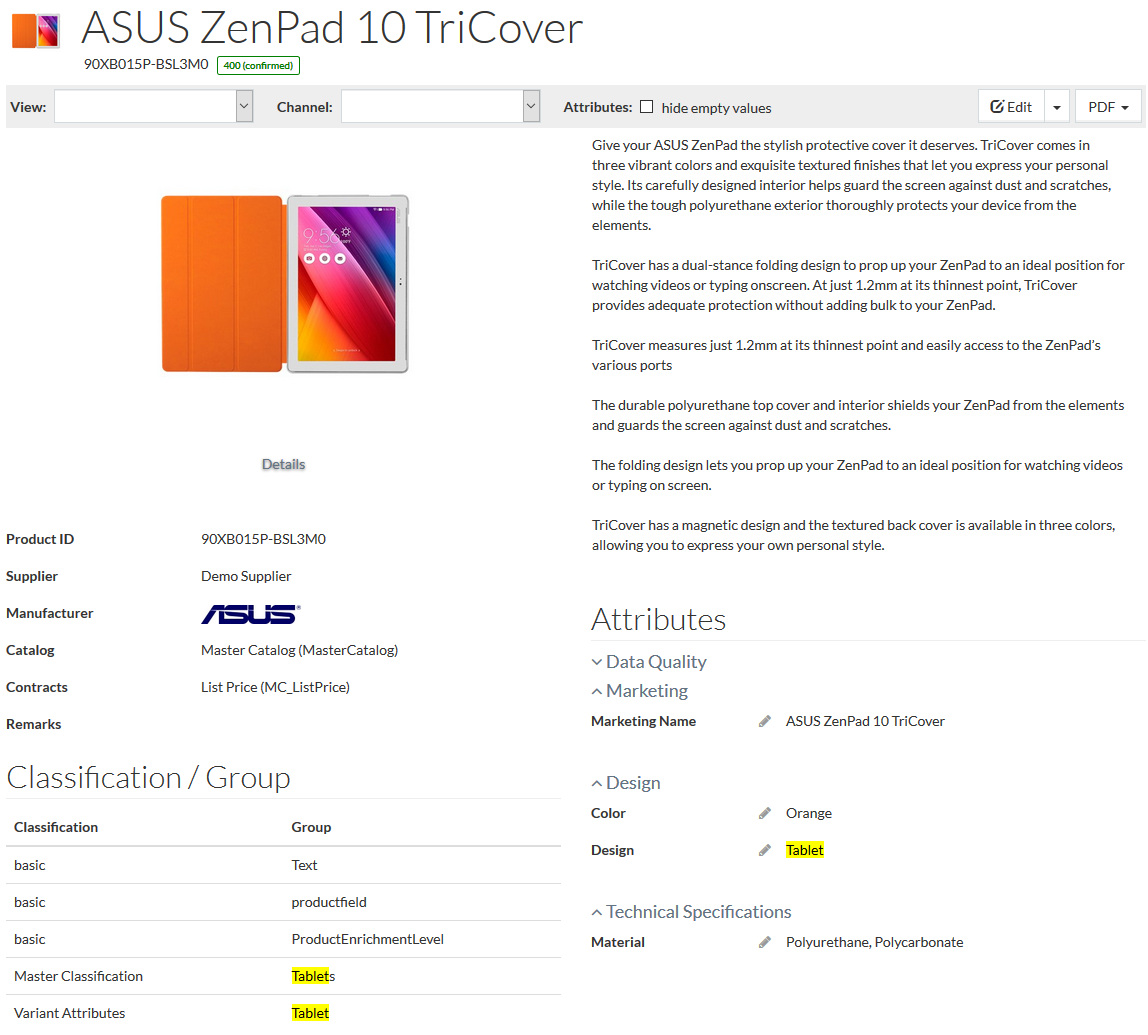
On the Term Usage page, click the word ' Term' in the header to go back to the Terms search results page or click the term itself ('Tablet' in the example above) to open the Term Editor for this term.
All the objects for which terms can be used are listed here. In case the term is used for some object the term and arrow
 icon will be
displayed. Click
to go to the
corresponding page and see the term usage.
icon will be
displayed. Click
to go to the
corresponding page and see the term usage.
|
The Product section of the Term Usage page shows the first 5 products where the term is used. |
When the Term is used in a
Product, clicking
opens a
Product Preview page, where all usages of the relevant Term will be highlighted yellow.
|
More words/phrases, which are not the term, but which are identical to the term translation, can be highlighted on the Product Preview page. |
Currently, terms can be used for the following objects:
| Object | Field in which Terms can be used |
|---|---|
| Product |
|
| Document |
|
| Classification |
|
| Classification Group |
|
| Value List Item |
|
| Attribute |
|
| Attribute Section |
|
| Compatibility Constraints |
|
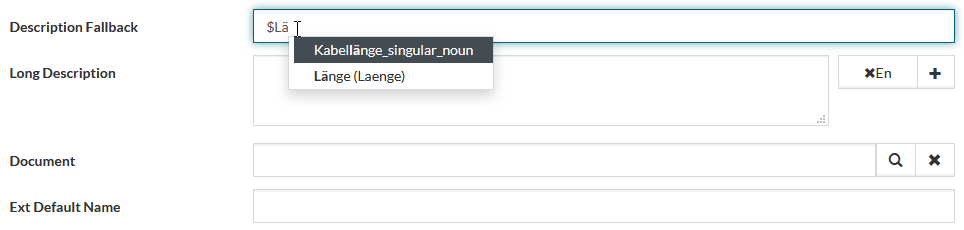
To use terms for the listed objects (except for expressions) use the following pattern: $<Term_ID>, e.g. $Laenge. Also you can select the appropriate term from the drop-down list when you start entering the $<Term_ID>:
For the expressions in the product attribute value the following pattern should be used: term('$<Term_ID>'), e.g. term('$blau'). You can also define the language in which Term should be displayed, e.g.: term('$blau','en-GB'). Autocomplete function is currently unavailable for expressions.
Fallback Languages and Final Translation Statuses
There is a possibility to set fallback languages for translations. It means that in case a translation for one locale in the final (accepted) status is unavailable, the fallback language can be used. E.g. en-GB translation is missing - en-US will be used.
|
Final (accepted) statuses and fallback languages for translations can be configured in the
settings.groovy file in the
Customization Area (
When no accepted statuses are defined, the translations in all statuses are considered accepted. |
In case the translation in accepted status is missing, the terms in value list items descriptions, markdown and text-table attributes and expressions are resolved in fallback language:
- On the Product Preview page
- At PDF export
- At JSON/PUBLICPRODUCT export
- In Result section of text-table attribute value editor for text-table attribute values.
|
The fallback logic for languages does not apply to expressions with references to value list items. |
Dashboard
Click the
 button to open the Terms Dashboard.
Here you will be able to see a full overview of the terms and terms' translations statuses, their Due Dates and the latest Exports.
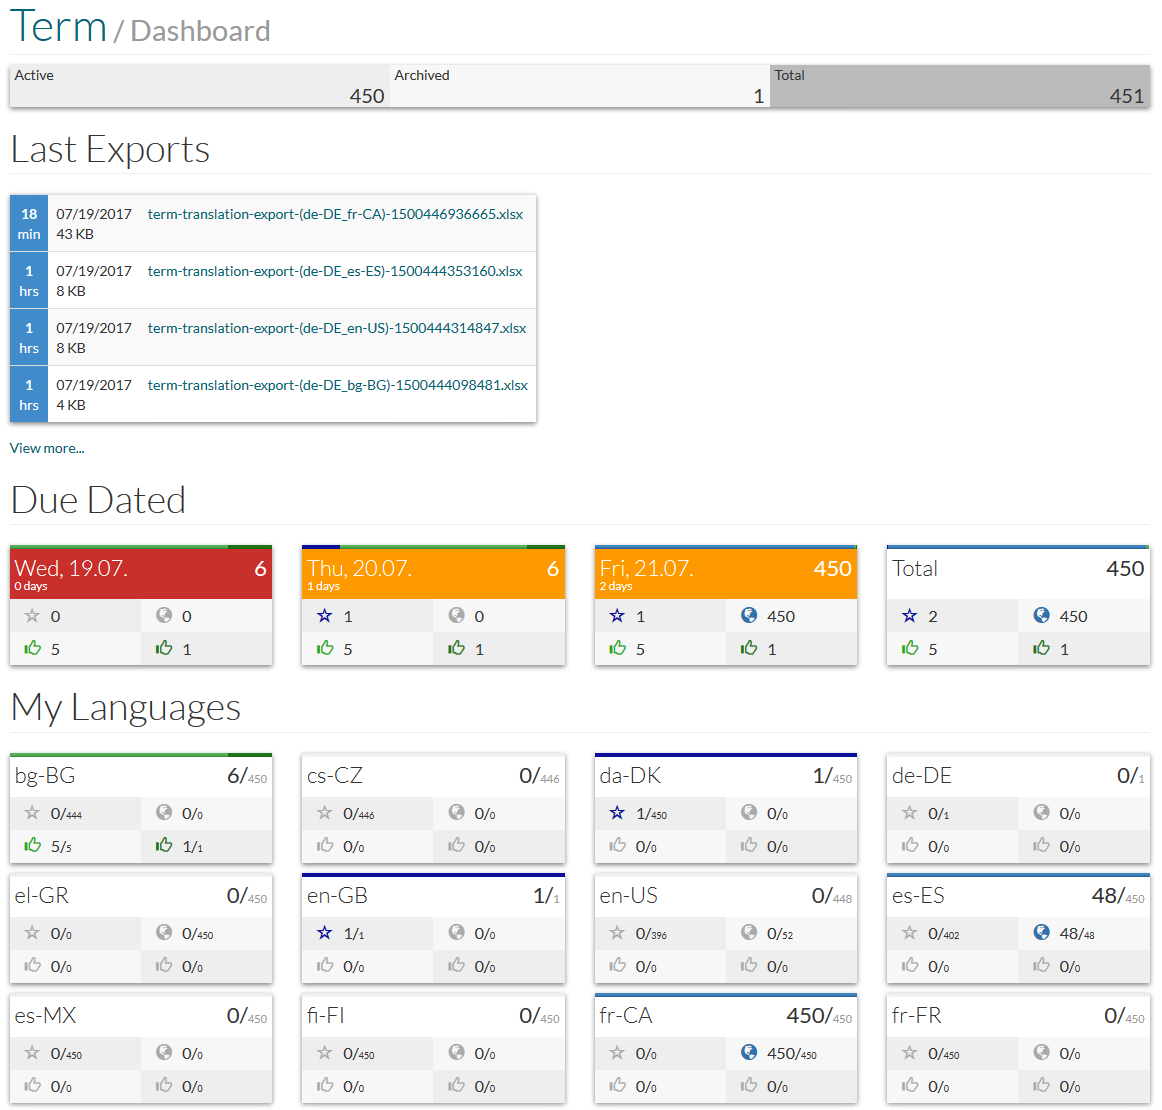
The following sections are available:
- Status Overview - in the section at the top of the page you can see overview of the quantity of terms in each status.
- Last Exports - the list of the latest executed term exports. Click
View more.. to see the full list.
- Due Dated - shows the overview of terms, for which due dates are set.
Red color corresponds to the today's date. The date, which is less than 10 days from the current date, is marked orange.
The colored line above a widget box shows the percent dispersion per status (similar to a pie diagram).
The following conventions for statuses are used:
-
 - the number of terms with '
New' text status.
- the number of terms with '
New' text status.
-
 - the number of terms with '
Translation In Progress' text status.
- the number of terms with '
Translation In Progress' text status.
-
 - the number of terms with '
Approval Required' text status.
- the number of terms with '
Approval Required' text status.
-
 - the number of terms in the '
Second Approval Required' status.
- the number of terms in the '
Second Approval Required' status.
-
- My Languages - shows the overview of the terms by language. The numbers are displayed as a fraction showing the quantity of unfinished (due) translations (for all statuses, but the final status from the
workflow) in the current language compared to the total number of terms for the language with the relevant status (for example, 1/450).
If no due date was established for the terms in the relevant status and no action is required, no colored line appears above the relevant box and the status symbols are gray.
JSON Export/Import
JSON is a common format for exporting and importing of all term data.
| You can add new terms and make terms data backup using JSON/Term export. |
Export
Select the appropriate terms using the checkboxes
 and select
JSON/Term option from the
drop-down, all the selected terms and translations will be exported.
and select
JSON/Term option from the
drop-down, all the selected terms and translations will be exported.
Click Download export result link to download the file.
Import
In the top right corner of the Term Search page select the
JSON/Term option from the
drop-down.
In the opened window select the import mode:
- Insert/Update mode - to perform the import of additional terms data or update current terms;
- Replace mode - to perform the full replacement of current terms data.
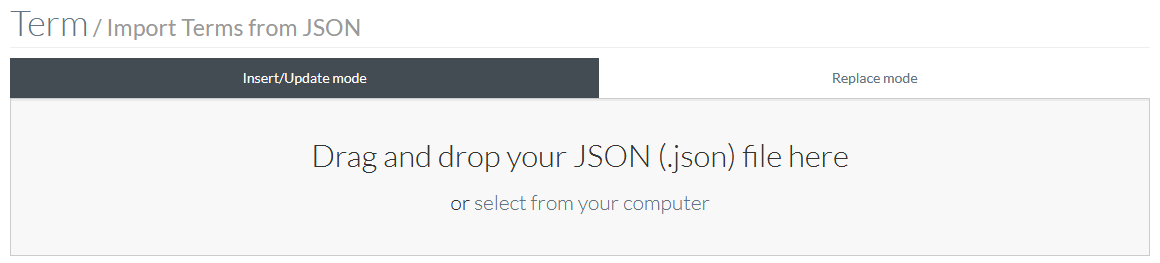
There are two options of the file upload - via drag and drop or by selecting the file from your PC using standard file browser.
Import completed message will be displayed upon the successful file upload with the number of successful or error entries.
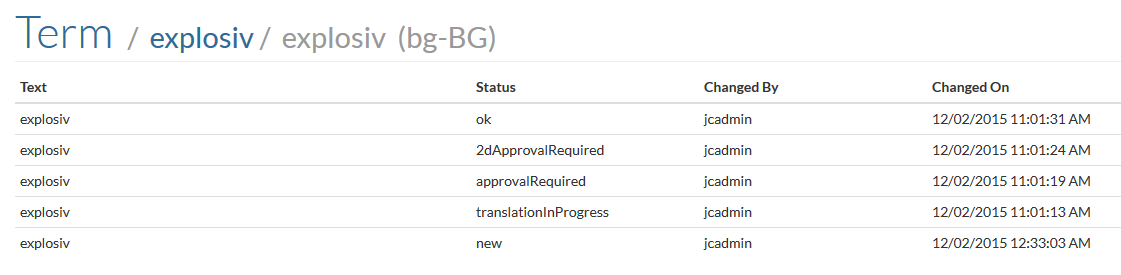
Revisions
Click
 to view
the history of changes/transactions for current term translation.
to view
the history of changes/transactions for current term translation.
Bulk Update
You can perform bulk operations for terms. Perform a search or select relevant terms using check boxes in the list of terms and click
button
at the bottom of the list on the right-hand side.
|
If no terms are selected, the bulk operation is executed in regard to all terms in the search result list. |

Select the language, for which the bulk operation will be performed. Select an Event, which is an operation to perform:
- Start translation - this operation changes the status of the selected terms to 'Translation in progress'.
- Finish translation - this operation changes the status of the selected terms to ' Approval required'.
- Reject - this operation rejects the translations of the selected terms and changes their status to ' New'.
- Approve - this operation approves the translations of the selected terms and changes their status to ' ok'.
Click
 to
perform the operation or
to return to the list of terms.
to
perform the operation or
to return to the list of terms.
When executed, a page with the results of the operation appears. It also lists the updated terms. Click on the term to see its details.
