Product Information Manager : New Mapping
Access
To get access to the New Mapping functionality click the Im-/Export menu - > New Mapping (in the Mapping Editor section).
You can also access the
New Mapping page by clicking
 in from the
Search Mapping page (
Im-/Export menu -
> Mapping
Search (in the
Mapping Editor section)).
in from the
Search Mapping page (
Im-/Export menu -
> Mapping
Search (in the
Mapping Editor section)).
Contents
Functionality
New Mapping page allows to define the mapping between fields in the imported file and fields in the PIM database.
The mapping creation process is divided into the following steps:
Upload
The first step to create a new mapping is to upload a file from an external source (e.g. your local PC).
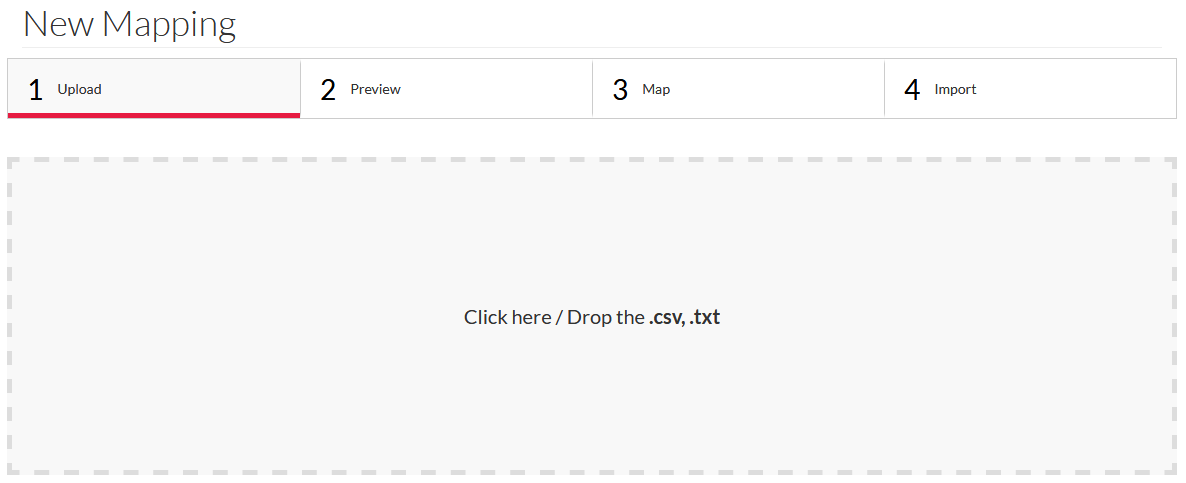
Click the defined field to select the file from your computer or drag and drop the relevant file into the field.
| Only CSV and TXT format files can be uploaded. |
Preview
The Preview page shows the uploaded data and allows to manage such settings as separators and formats.
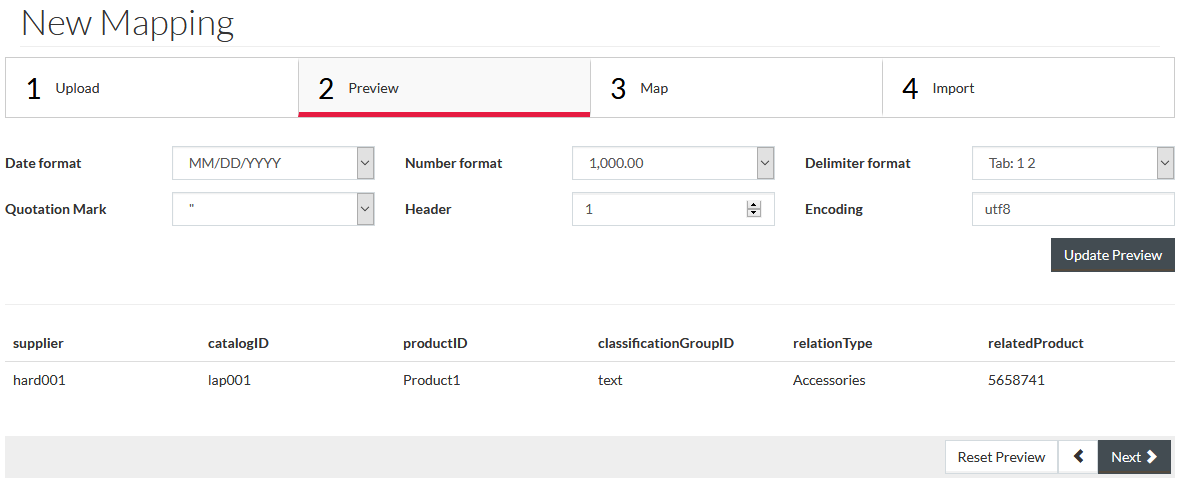
PIM analyzes the structure of the import file, shows the first 5 lines (below the header) of uploaded file to review and change the following settings if required:
- Date format: select a date format from the drop down list - e.g. mm/dd/yy or dd-mm-yyyy.
|
The valid date format for date type attributes in the import file should be YYYY-MM-DD. Otherwise the attribute value is imported and highlighted as invalid in the Product Editor. |
- Number format: select a desired number format including the decimal separator (a dot or comma) to be used from the drop-down list - e.g.1,000.00 or 1.0000,00.
- Delimiter format: from the drop-down list, select a separator used to separate the lines and columns in the uploaded document to convert it.
- Quotation Mark: select a type of quotation mark used in the uploaded document to consider.
- Header: specify if there is a header in the uploaded document to consider.
- Encoding: change the uploaded file encoding manually if it is different from the auto-detected encoding.
|
The values containing only digits are automatically regarded as numbers, therefore they will be accordingly transformed in Preview and during the import. For example, '0' as a starting symbol in Product IDs, statuses and attribute values containing digits only, will be omitted.
|
After updating the fields, click
 to
reload the file preview.
to
reload the file preview.
|
The formats on the Preview page should comply with the formats used in the uploaded file. If the auto-detected or selected format does not comply with the actual format from the uploaded file, the values in Preview can be displayed incorrectly or turn to '0'. It may result in incorrect parsing and further import. |
Click
 to
restore the initial preview settings.
to
restore the initial preview settings.
Click
 to return
to the
Upload step.
to return
to the
Upload step.
Click
 to
continue.
to
continue.
Map
This step involves matching of fields from the Input file columns and the corresponding properties in PIM to create the mapping by their Assignment in PIM.
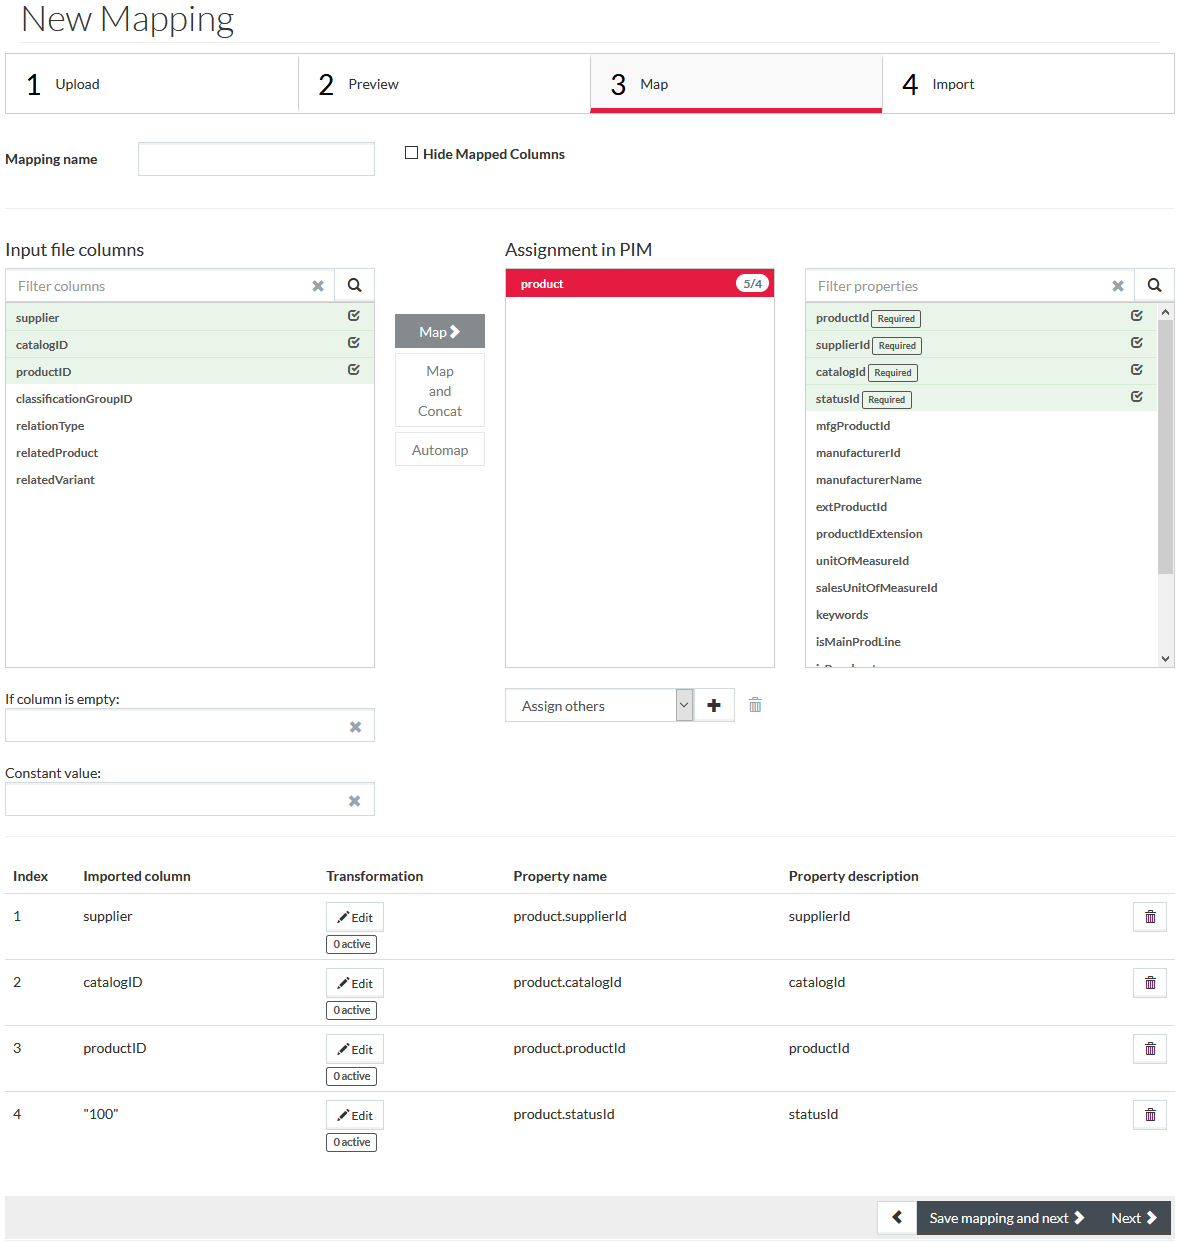
The page has the following structure:
Input File Columns
All the Input file columns are listed in the leftmost table:
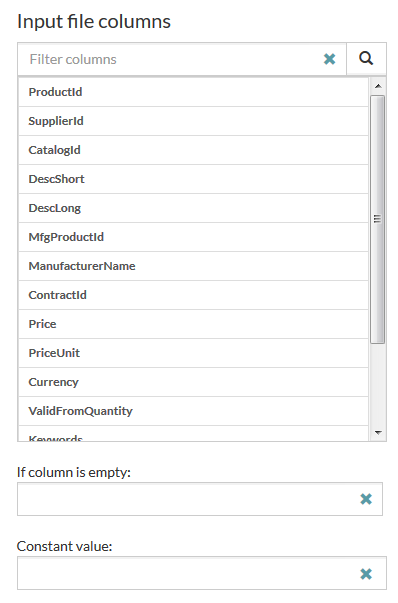
You can filter the columns by entering the column name (full or partial) and clicking
 .
.
It is possible to map a property in PIM with:
- a column from Input file columns
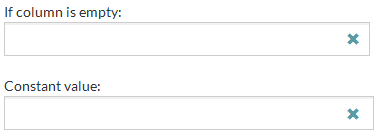
- a column which has no value in the Input file. In this case, select the Input file column and enter the value to be applied when the relevant Input file column is empty into the If column is empty field.
- a constant value, when there is no such a column in the Input file. Enter the constant value into the Constant value field. In case of mapping such properties as ClassificationID, ClassificationgroupID, Status, StatusID, Attribute, select the relevant constant value from the drop-down list (or pop-up window).
Selecting the Hide Mapped Columns check box in the header section will hide the columns in the Input file columns section that have been already mapped. Clear the check box to see the mapped columns in the Input file columns list.
Assignment in PIM
Assignment in PIM shows groups of properties with their extended list in the rightmost column.
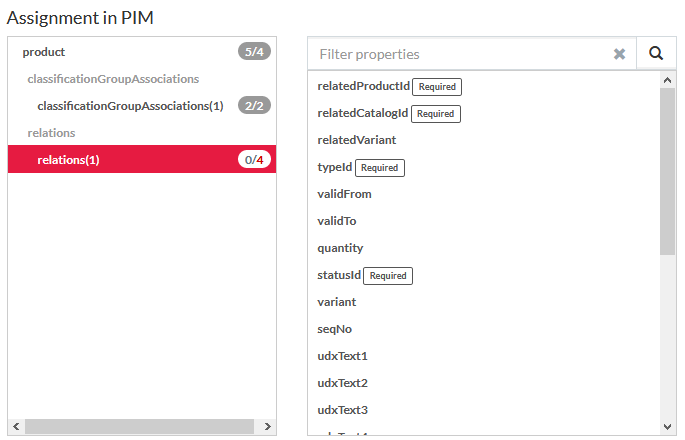
The required properties for mapping from the group are marked as follows:
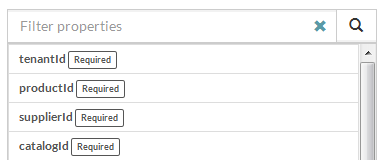
The number of mapped properties and required-for-mapping in every group are also displayed in the Assignment in PIM table.
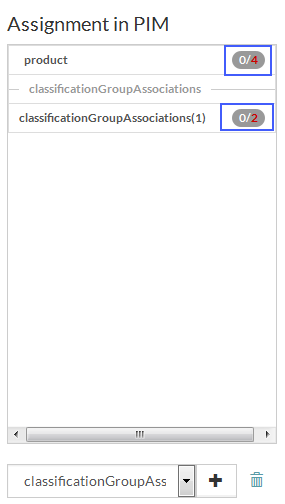
You can add a properties group by selecting it from the drop-down list and clicking
 . It will move
the group into
Assignment in PIM. Click the relevant group to show its expanded list of properties on the rightmost table.
. It will move
the group into
Assignment in PIM. Click the relevant group to show its expanded list of properties on the rightmost table.
To delete the group from the
Assignment in PIM click
 .
.
Mapping Action Buttons
The mapping can be executed using the following buttons:
- Select a property for mapping from the rightmost list of properties in
Assignment in PIM and a column from the
Input file columns or enter the value into
If column is empty or
Constant value field, when applicable. Click the
 button to map them.
When neither the property in
Assignment in PIM is selected nor the Input file column (or
Constant value field is entered), the
 button is disabled. button is disabled.
|
 maps
a column from the
Input file columns (or
If column is empty value or
Constant value) with the
Attribute and
Values properties. For example, it allows mapping columns from the input file that do not have a corresponding property in PIM or if you wish to regard the column as Attribute and Values.
maps
a column from the
Input file columns (or
If column is empty value or
Constant value) with the
Attribute and
Values properties. For example, it allows mapping columns from the input file that do not have a corresponding property in PIM or if you wish to regard the column as Attribute and Values.
 button can help you to map
two or more columns from the
Input file columns with one property in PIM. Select a property that has already been mapped, select a column from Input file columns or enter the value into
If column is empty or
Constant value field.
button can help you to map
two or more columns from the
Input file columns with one property in PIM. Select a property that has already been mapped, select a column from Input file columns or enter the value into
If column is empty or
Constant value field.
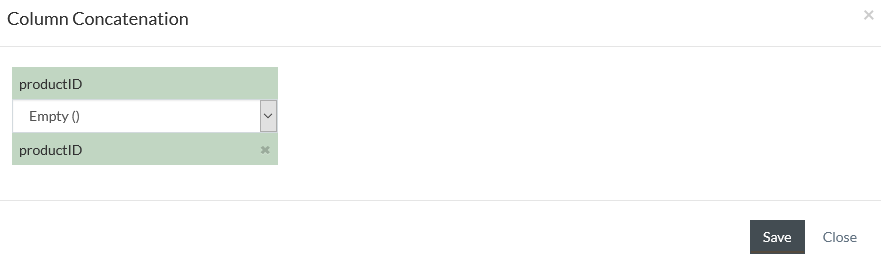
Clicking
will open a
Column Concatenation window. From the drop-down list, select the delimiter to separate the source columns from one another at concatenation. Later, the concatenation can be modified by clicking
 under
Transformation in the Mapping Table.
under
Transformation in the Mapping Table.
Click
 to save
the Column Concatenation and map or
to save
the Column Concatenation and map or
 or
or
 to close the window without changes.
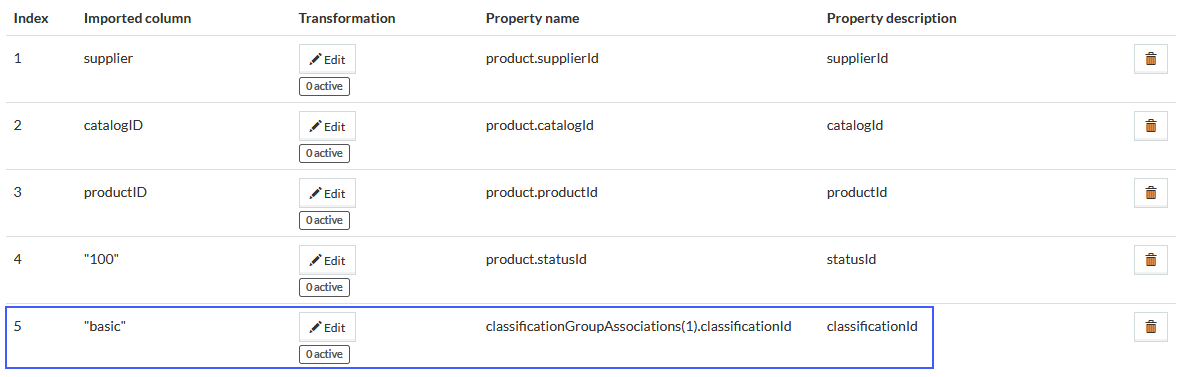
Mapping Table
The mapped properties and columns will be highlighted in green in their relevant lists.
All the mapped columns and properties also appear in the table on the bottom of the page:
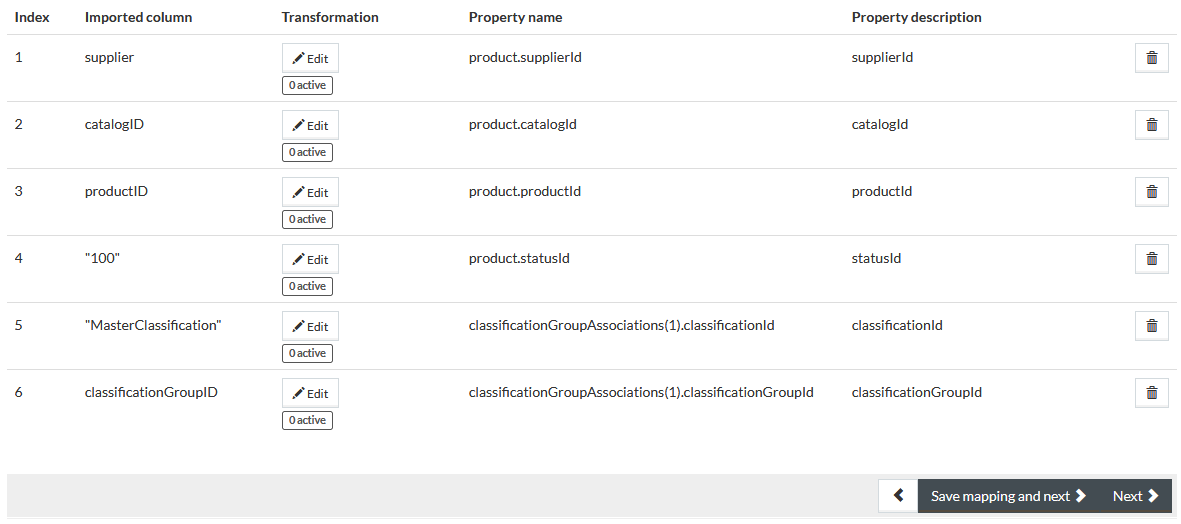
The list of mapped columns and properties allows reviewing the entries by
Imported columns,
Property name and
Property description field
and allows deleting the mapped entry by clicking
 .
.
Values Transformation
Click
under
the
Transformation to select possible transformations in the values of the mapped columns.
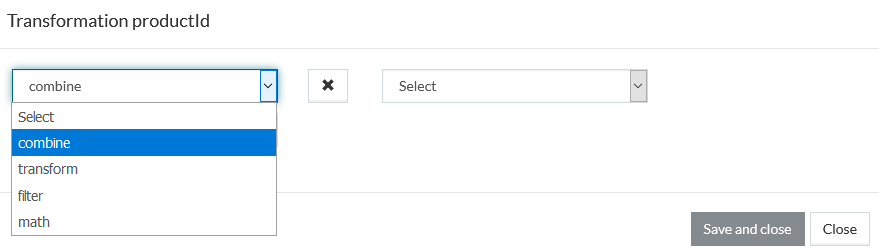
- Combine allows to:
- Append the given text to actual value (to enter symbols to be added after the relevant text)
- Prepend the given text to actual value (to enter symbols to be added before the relevant text)
- Transform allows to:
- Change to upper case
- Change to lower case
- Remove whitespaces
- Remove all (removes all specified characters from the string)
- Replace (replaces the first occurrence of the characters with other characters specified)
- Replace all (replaces all occurrences of the character/value with a different one)
- Filter allows to:
- Get content before (truncates the value leaving the remaining content before the specified character(s))
- Get content after (truncates the value leaving the remaining content after the specified character(s))
- Substring the value leaving the characters from start index (the first character's index is 0) to end index (non-inclusive). For example, if you select 'from' index 3 and 'to' index 10 from 'SupProductNumber', it will leave 'Product'.
- Leave the specified number of first characters (First)
- Leave the specified number of last characters (Last)
- Math allows to:
- Add
- Subtract
- Multiply
- Divide the value by a given number.
|
Combine, transform and filter transformations can be applied to strings and string arrays. Math transformation can be applied to numbers or strings that can be parsed into numbers. |
Selecting one option will automatically create a new line to select the transformation option. Multiple transformations are possible. The number of transformations applied can be viewed by the
button.
Click
 to
delete the transformation entry. Click
to
delete the transformation entry. Click
 to
save the transformation or
to
save the transformation or
 to
close the window without saving.
to
close the window without saving.
Click
to return
to the previous step.
Click
 to save the created new mapping and proceed to
Import, click
to
proceed with the mapping without saving.
to save the created new mapping and proceed to
Import, click
to
proceed with the mapping without saving.
|
Before saving, give a name to the mapping in a Mapping name field. |
|
The mapping name can contain only alphanumeric characters, underscore "_" and dash "-". |
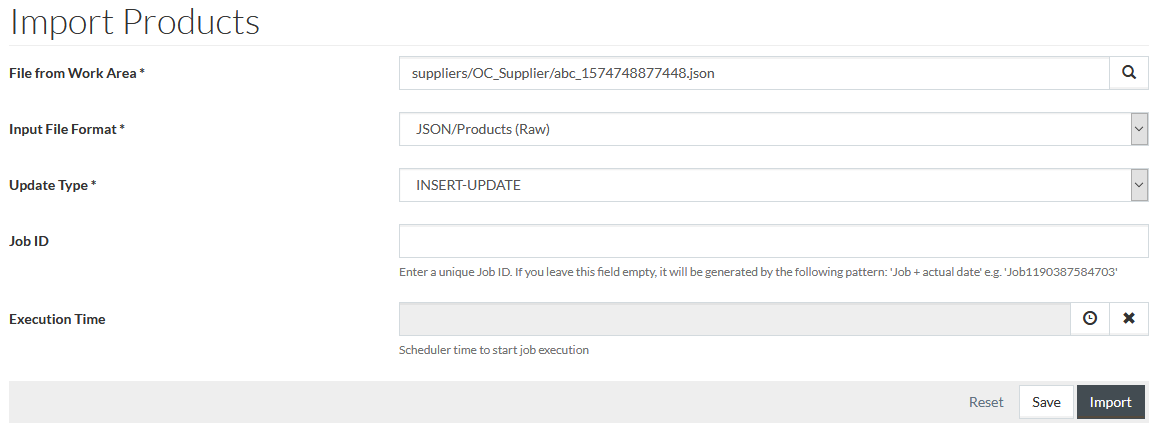
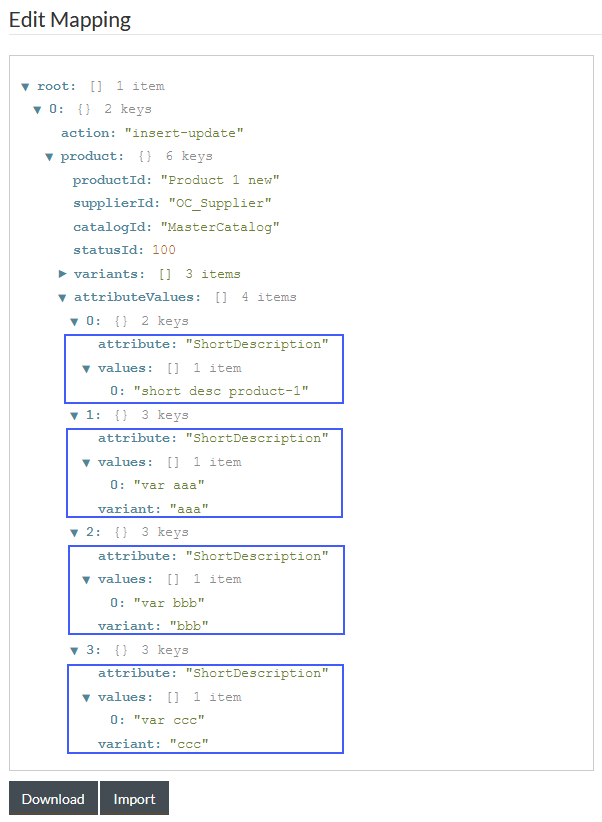
Import
The Import step shows 3 lines of mapping that has been created as a result of the previous steps.
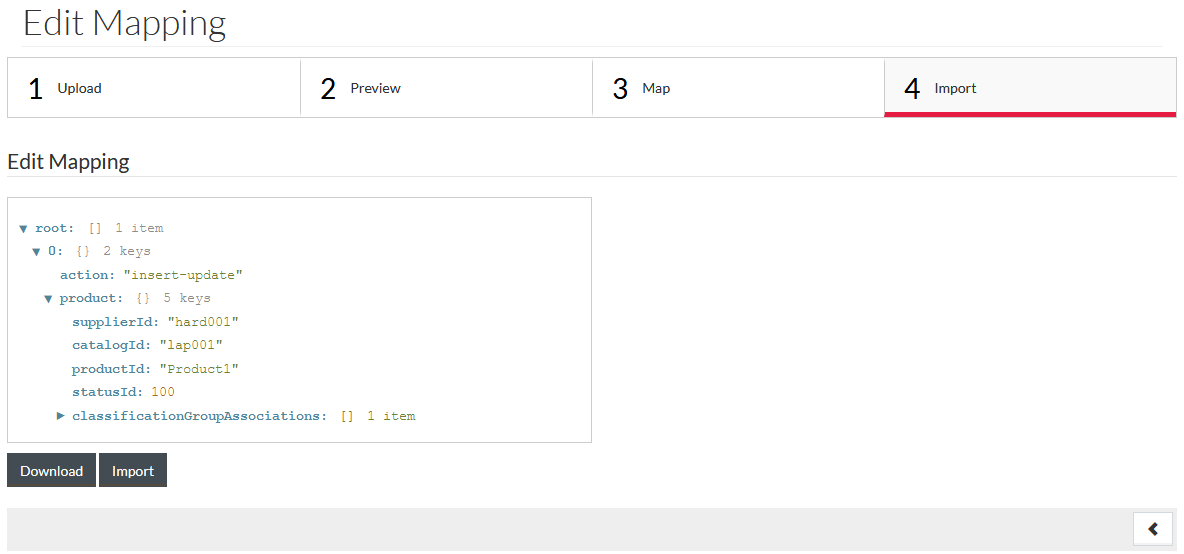
Click
 to expand the item to see the details.
Click
 to
download the complete mapped data; click
to
download the complete mapped data; click
 to
execute or schedule the products import using the created mapping.
to
execute or schedule the products import using the created mapping.
See more on import products job on Import Products and Prices page.
Examples
Examples of mapping the classification, classification group, attribute and attribute value are provided below:
|
Some fields can be mapped as collections within one product. It means that the multiple entries for the following elements listed in one column but different rows (for one product) can be imported for this product:
For the following elements, only one (first) value is taken:
Therefore, every new contracted product, relation, document association or price for one product should be mapped as a new element. |
Classification Mapping
To map a classification with a constant value, you should add classificationGroupAssociations from Assign others drop-down list to the Assignment in PIM.
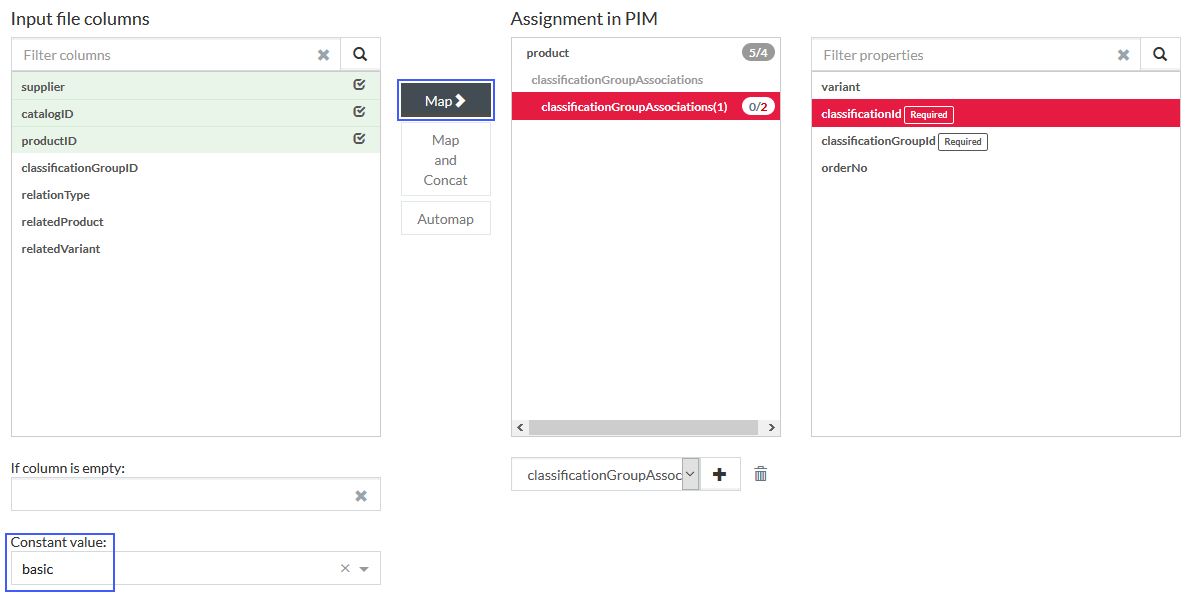
Click the classificationId from the rightmost column. In the
Constant value field, start entering the classification description to use autocomplete function or select the classification from the drop-down list and click
.
The classificationId will be mapped with the selected classification as a constant value.
Classification Group Mapping
To map a classification group with a constant value, you should add classificationGroupAssociations from Assign others drop-down list to the Assignment in PIM.
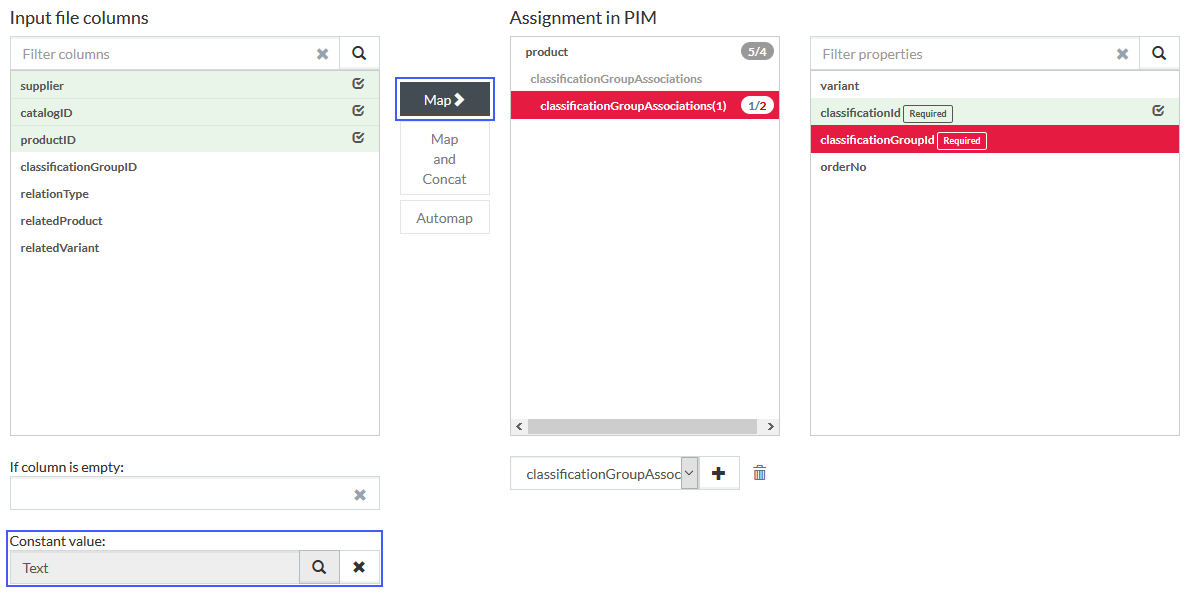
Click the classificationGroupId from the rightmost column, use
to find the
classification group you want to map from the Classification browser under
Constant value field and click
.
The classificationGroupId will be mapped with the selected classification group as a constant value.

Attribute Mapping
To map an attribute, you should add attributeValues from Assign others drop-down list to the Assignment in PIM.
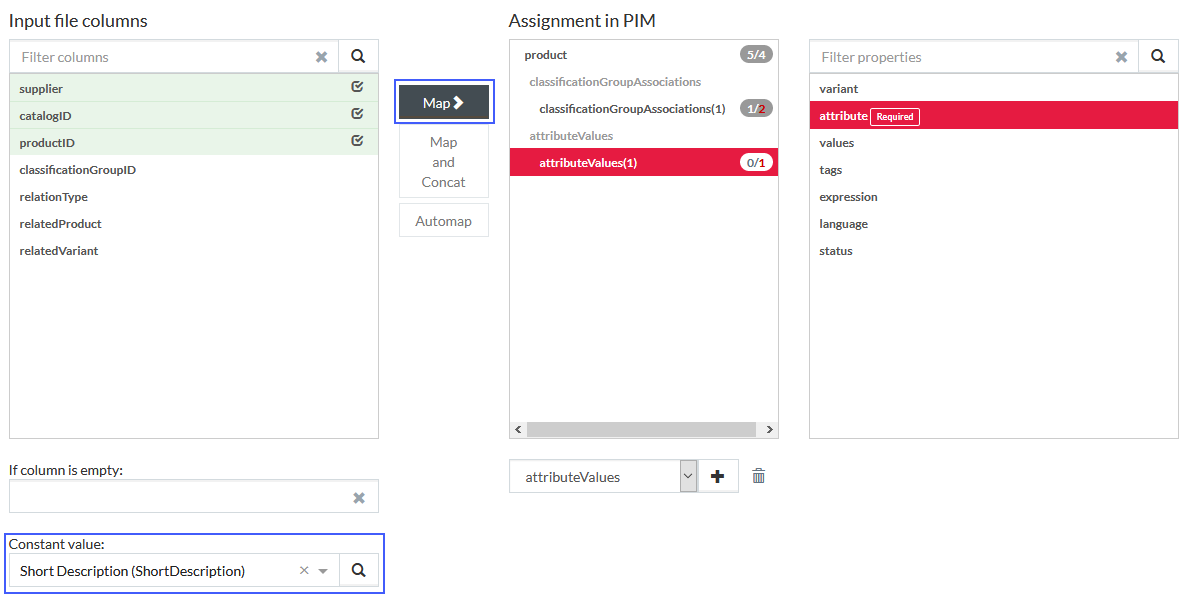
Click
attribute from the rightmost column, start typing the attribute in
Constant value field to use the autocomplete function or use
to find it
from the
Search for Attributes page and click
.
The selected attribute is mapped.

Attribute Value Mapping
To map an attribute value with some value used if column is empty, you should add attributeValues from Assign others drop-down list to the Assignment in PIM.
Select the column in Input file columns you want to map and click values in the rightmost table to highlight the field.
Enter the value to be used if the column has no value and click
.
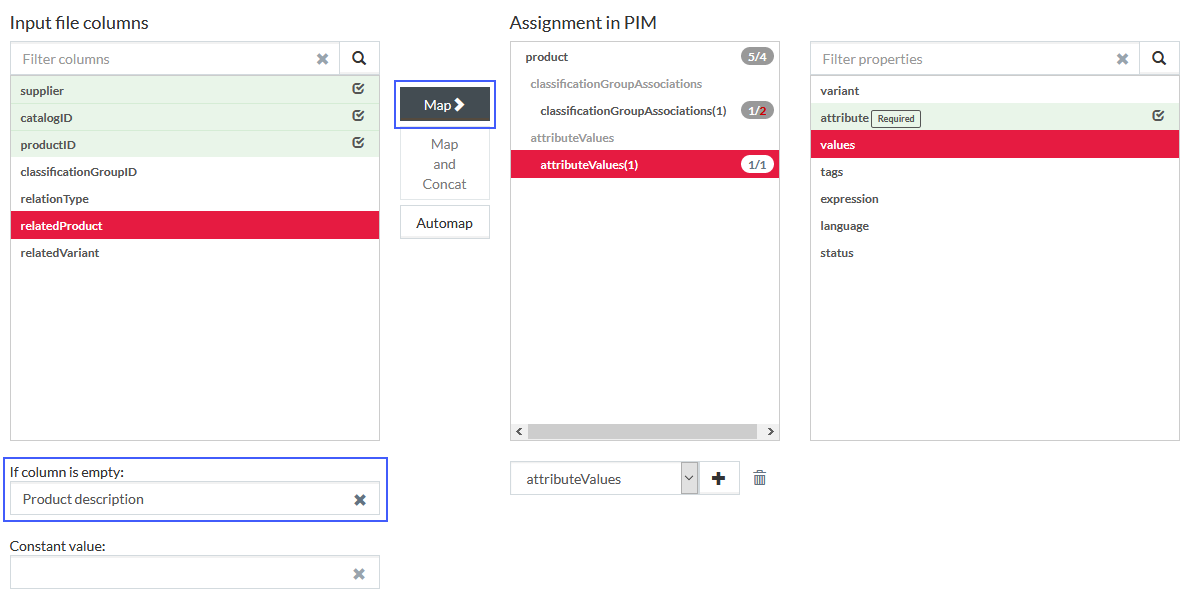
In the example above, 'Communication device' value will be used, when no value for CustProdDescription is provided.

Master and Variant Attribute Values Mapping
To map attribute values for master and variant products, you should have the following columns in the input file:
- a column with variants (Variant IDs)
- a column with variant statuses (or assign the variant status as a constant value)
- a separate column with master attribute values
- a separate column with variant attribute values
To map master product attribute value, add attributeValues from Assign others drop-down list to the Assignment in PIM and assign an attribute (see Attribute Mapping section above). Then assign master attribute values column from your file to values.
To assign variant attribute value, add attributeValues from Assign others drop-down list to the Assignment in PIM and assign the attribute. Then assign variant attribute values column from your file to values. Also assign variants column to variant.
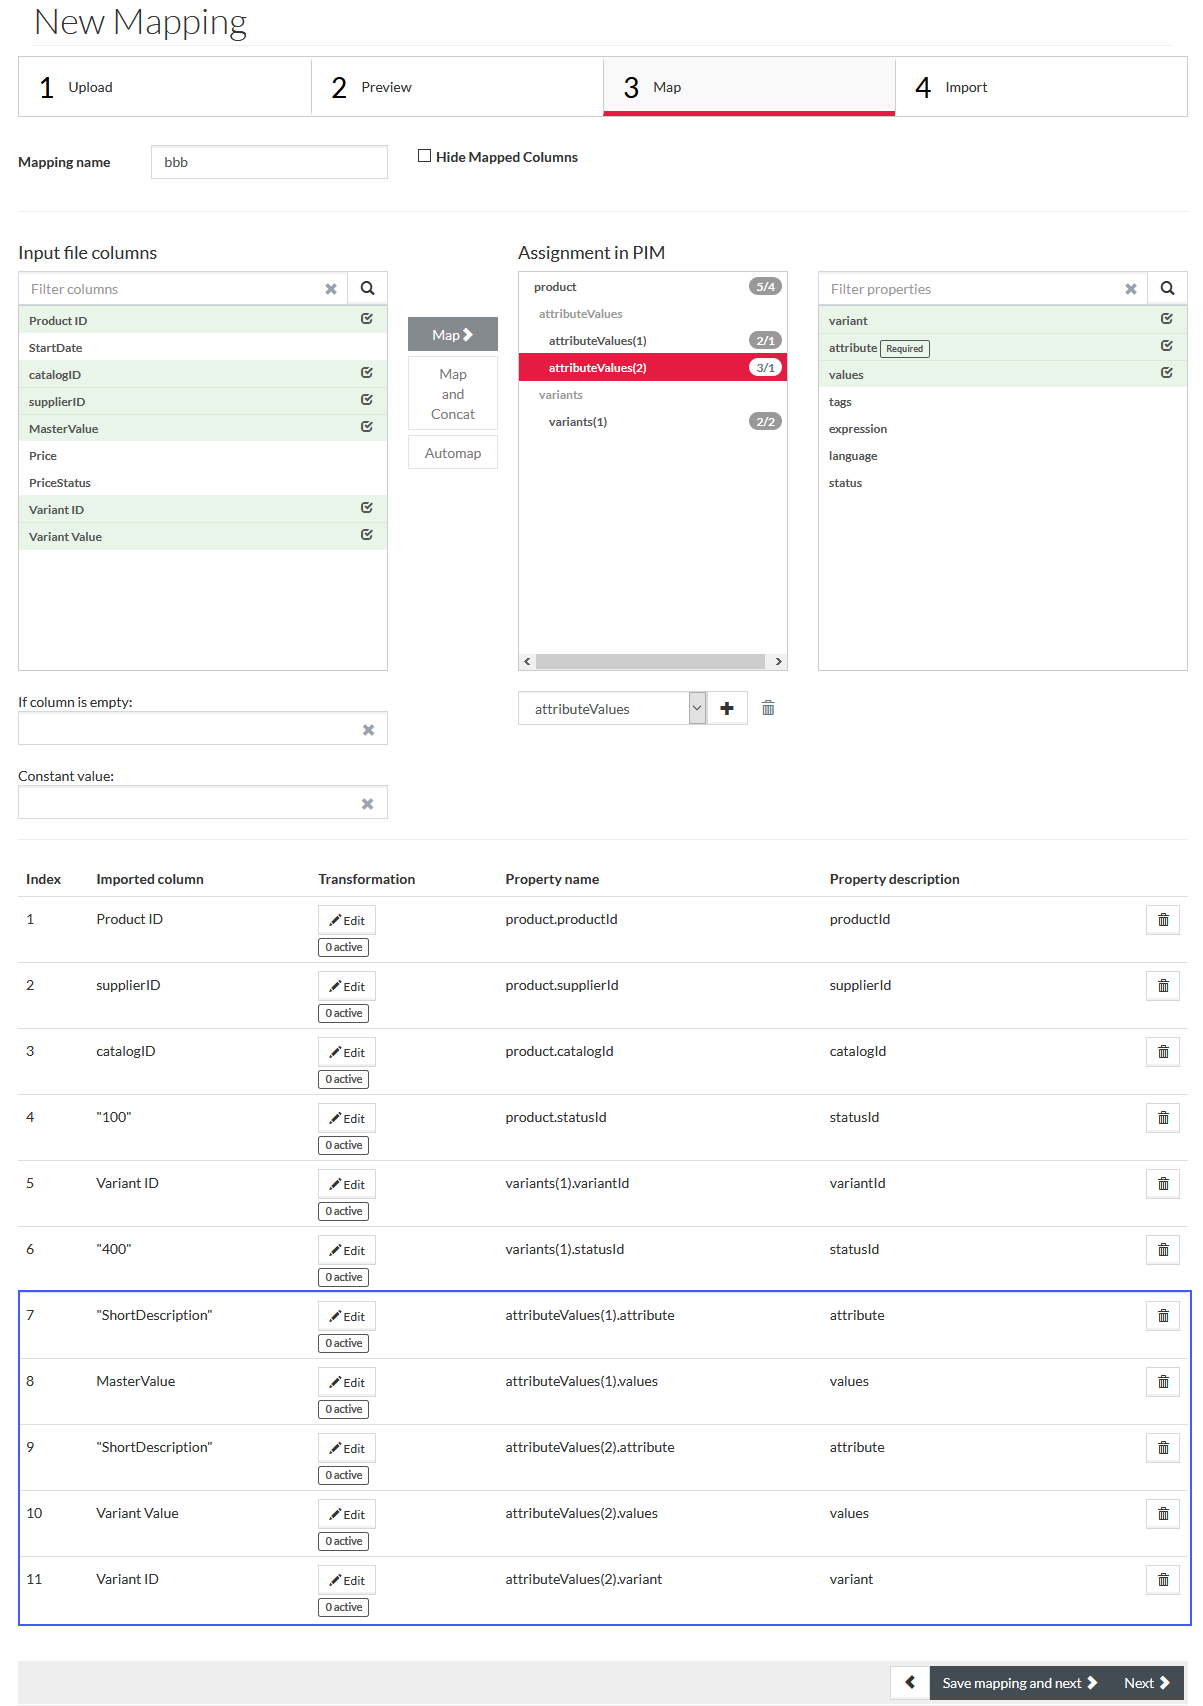
Below is an example of resulting mapping:
Multi-valued Attribute Values Mapping
If you want to map a multi-valued attribute, each value of the multi-valued attribute should be entered into a separate cell of the same column mapped to the appropriate multi-valued attribute.
You can assign master and variant attribute values for a multi-valued attribute using the mapping pattern described in Master and Variant Attribute Value Mapping section.
In the file below, each value for a multi-valued attribute is given in a separate cell.
| Product ID | Variant ID | Master Value | Variant Value | catalogID | supplierID | statusID |
|---|---|---|---|---|---|---|
| Product1 | 201 | Black | Orange | lap001 | hard001 | 100 |
| Product1 | 202 | White | Blue | lap001 | hard001 | 100 |
| Product1 | 203 | Brown | lap001 | hard001 | 100 | |
| Product1 | 201 | Green | lap001 | hard001 | 100 | |
| Product1 | 202 | Silver | lap001 | hard001 | 100 | |
| Product1 | 203 | Purple | lap001 | hard001 | 100 |
The import will result in the following attribute values (for example, when assigned to ColorRange multi-valued attribute).

Expressions Mapping
Attribute values may include expressions. To map attribute value expressions, add attributeValues from Assign others drop-down list to the Assignment in PIM.
Map an attribute as described in Attribute Mapping section, then map the expression property from the rightmost pane and the relevant column from the Input file columns or map the Constant value.
There is no need to map the values property.
After the import, the mapped values will appear in the product marked as expressions.

Variant-to-Variant Relation Mapping
It is possible to establish the relations of product variants with specific variants of some other products in PIM.
To map such a relation, you should add relations from Assign others drop-down list to the Assignment in PIM.
Map the required properties ( relatedProductId, relatedCatalogId, typeId and statusId) as well as variant (product variant) and relatedVariant (related product variant).
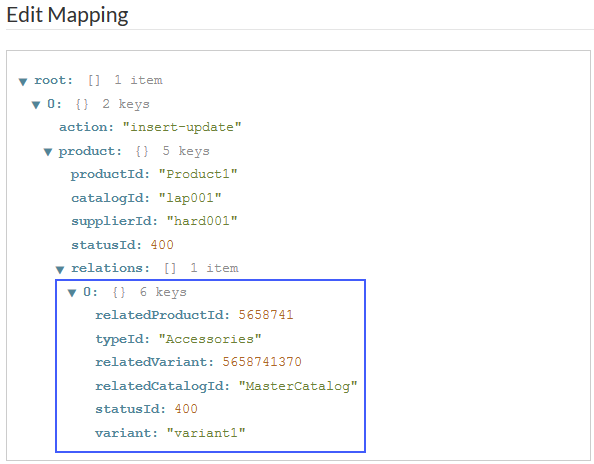
In this way, the relation of 'variant1' of the imported product to the specified variant of product '5658741' will be imported.
